LED strip lights are gaining popularity in home improvement projects because they are energy-efficient, versatile, and easy to install. LED strip lights offer a versatile solution to enhance any space’s ambiance, whether you’re aiming for accent lighting, task illumination, or purely decorative effects. While installing
LED strip lights may appear intimidating initially, with proper guidance, it becomes a straightforward and rewarding endeavour. Within this comprehensive guide, we will cover everything necessary for installing LED strip lights, including the process of mounting them effectively.
From selecting the appropriate type and length of LED strips to properly securing them to your desired surface, we’ve got you covered. Follow these step-by-step instructions to illuminate your living space with the brilliant glow of LED strip lighting and create a stunning ambiance.
Within this comprehensive guide, we will cover everything necessary for installing LED strip lights, including the process of mounting them effectively and how to set up LED lights.
From selecting the appropriate type and length of LED strips to properly securing them to your desired surface, we’ve got you covered. Follow these step-by-step instructions, including setting up your LED lights, to illuminate your living space with the brilliant glow of LED strip lighting and create a stunning ambiance.
Measuring and Cutting the Led Strips
Accurate measurement is key to a successful LED strip light installation. Begin by using a tape measure to determine the entire length of the surface where you plan to install the LED strip lights (https://lucasled.ie/led-strip-lights).
Take into account any corners, bends, or uneven surfaces, as these will affect the total length required. Mark these measurements on the installation area to provide a clear guide during installation. This ensures that you accurately calculate the amount of LED strip lighting needed for your specified areas, avoiding excess or shortage.
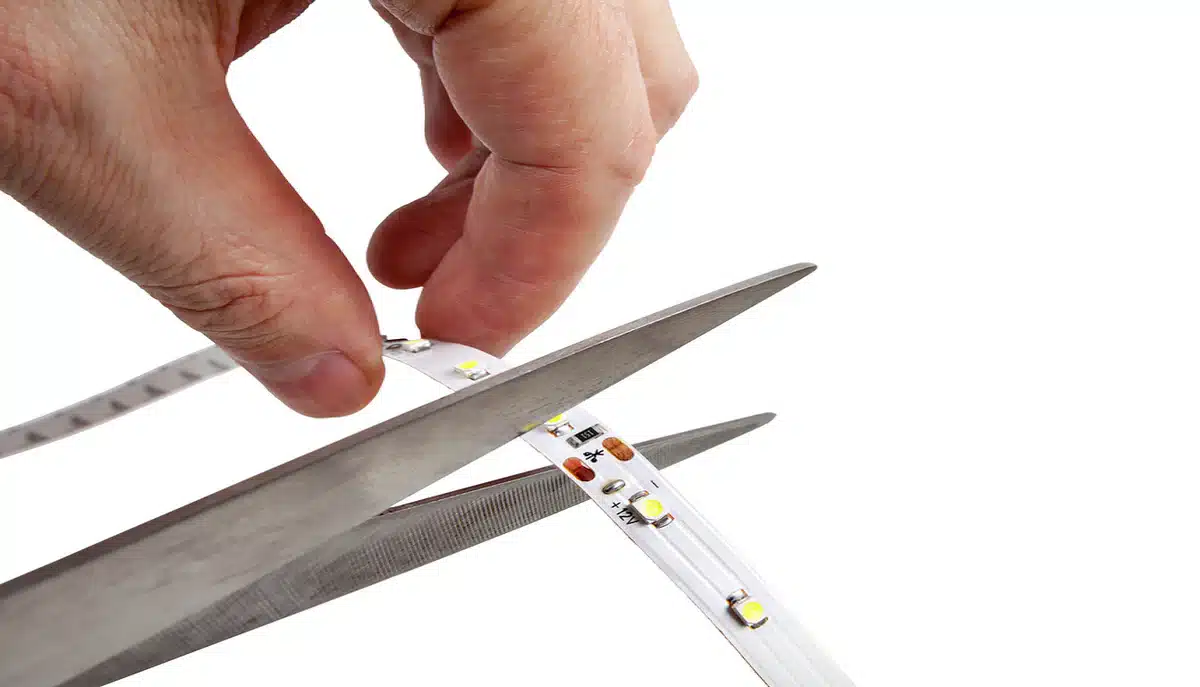
Cutting the Led Strips
Once you have taken your measurements, the next step is to cut the LED strips to the appropriate length. Most LED light strips come with designated cut lines, often marked by small scissors icons or a dotted line. Use sharp scissors to carefully cut along these lines, ensuring a clean cut that facilitates proper connectivity.
Be cautious not to cut the light strip at any point other than these marked lines, as improper cutting can damage the strips and prevent them from functioning correctly. Make sure the cut end is suitable for connecting to the power source or one strip to another.
If you need to make connections, ensure you have the necessary strip connectors and connector clips to join sections together.
Preparing the Surface
Before you begin attaching your LED strip lights, it’s crucial to properly prepare the installation surface. Begin by thoroughly cleaning the surface to ensure a secure adhesion of the LED strip lights’ adhesive backing. Utilize a clean cloth and soapy water to effectively eliminate any dirt, grease, or dust.
For an even better clean, follow up with alcohol wipes to ensure the surface is completely free of any residues. This step is crucial, as a dirty or greasy surface can prevent the adhesive from sticking properly, leading to issues with your LED strip lighting down the line.
Drying and Inspecting the Surface
After cleaning, take care to ensure that the surface is fully dried to optimize adhesion when applying the LED strip lights. Moisture can also interfere with the adhesive backing, reducing its effectiveness.
Take a moment to inspect the surface for any remaining dirt or uneven areas that could potentially impede the installation process. If you’re working on textured surfaces, you might need to consider using additional adhesive backing or fixing clips to ensure the LED strips stay firmly in place.
Marking the Installation Area
Once the surface is clean and dry, use a tape measure and a marker to outline where you plan to install the LED strips. This can include marking the entire length, corners, and any other critical points where the strips will need to bend or turn.
These markings will act as a guide throughout the installation process, ensuring precise positioning of the LED strips and preventing any misalignment.
Installing the Led Strip Lights
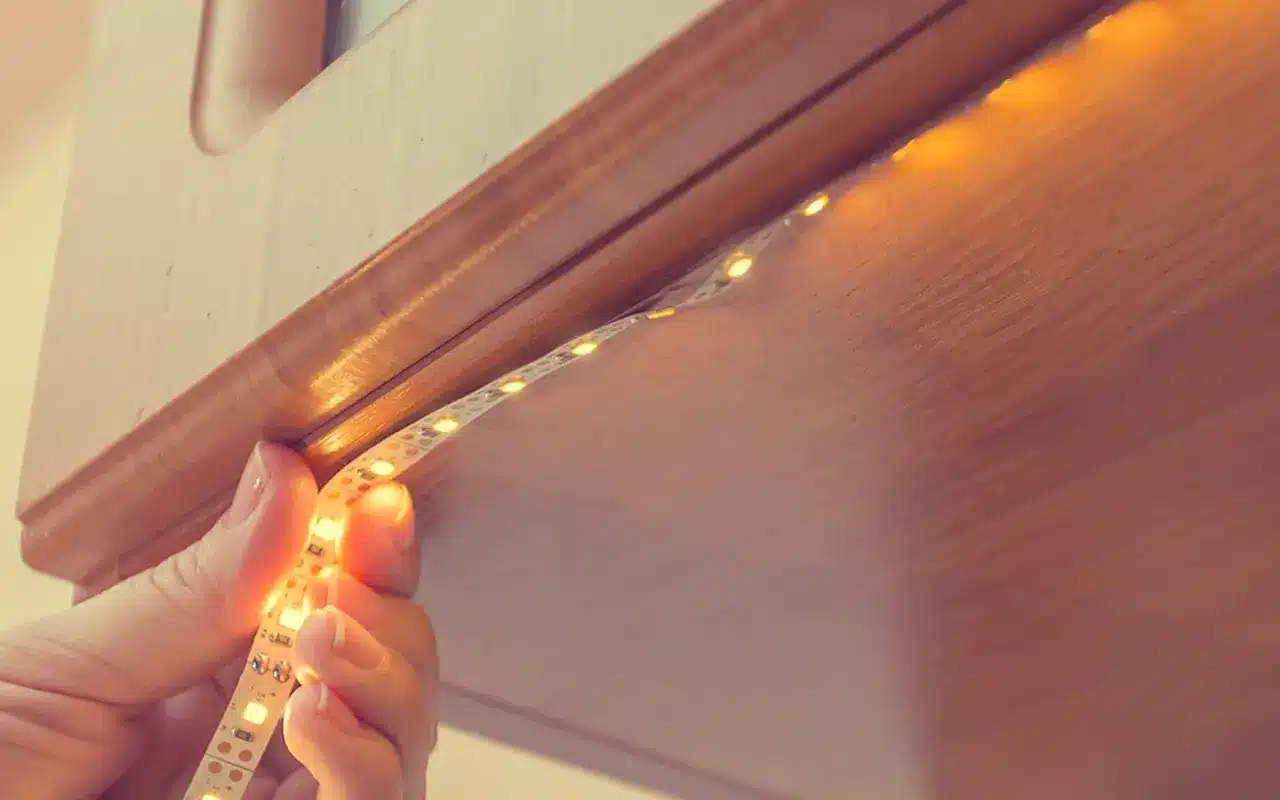
With your surface clean and measurements marked, you’re ready to start attaching the LED strips. Start by gently peeling off a small section of the adhesive backing from one end of the LED strip. Firmly press the strip onto the marked starting point on the installation surface.
As you continue to peel off more of the adhesive backing, press the LED strip firmly along the marked path, ensuring it adheres evenly and securely.
For textured or uneven surfaces, additional adhesive backing or fixing clips can provide extra support. Place fixing clips at regular intervals along the LED light strip, pressing them firmly to secure the LED strips in place.
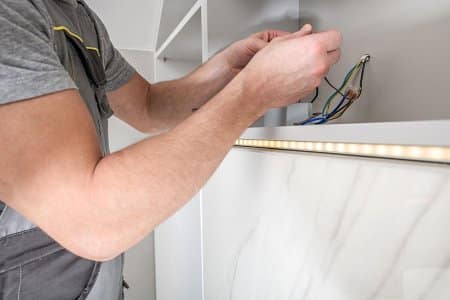
Connecting the Strips to The Compatible Power Supply
After attaching the LED strips, the next step is to connect them to the power supply. Use strip connectors and connector clips to join multiple LED strips together if needed. Ensure technical accuracy by matching the positive (+) red wire and negative (-) blue wire terminals correctly.
Typically, positive terminals are indicated with a red wire and negative terminals with a blue wire, but it’s essential to verify this with your specific LED strip and power supply. Ensuring proper alignment and connection of these colour-coded terminals is important to ensure that your LED strips function optimally and maintain their longevity over time.
Next, attach the other end of the strip to the power supply, ensuring compatibility and avoiding power output issues. Take the time to double-check all connections to ensure they are securely fastened and correctly aligned.
Setting up The Controller Unit and Remote Control
If your LED strip lights come with a controller unit and remote control, now is the time to set them up. To learn “how to set up LED lights “follow these steps. Attach the controller unit first to the power supply and then to the LED strips. Follow the manufacturer’s guidelines to synchronize the remote control with the controller unit.
After completing these steps, plug the power supply into a wall outlet and activate the LED strip lights. Use the remote control to test the lights, checking for any sections that may not be lighting up correctly. Adjust settings such as brightness and colour to customize the lighting to your preferences and ensure the lights are operating as desired.
Final Adjustments
After testing the lights, make any final adjustments to ensure the strips are securely attached and properly aligned. Press firmly on any areas where the adhesive backing may not be fully adhering to the surface. For additional support, consider using more fixing clips or adhesive backing in areas that need extra reinforcement.
By carefully following each of these steps, you’ll set yourself up for a successful installation of your LED strip lights, ensuring they are securely placed and function as intended. This methodical approach guarantees that your lights are securely attached, properly connected, and fully functional, providing a beautiful and effective lighting solution for your space.
Choosing the Right Led Strip Lights
Selecting the appropriate LED strip lights is crucial in achieving the desired lighting ambiance. LED strips come in a wide range of colours, brightness levels, and waterproof ratings to suit different preferences and installation environments.
Consider the purpose of the lighting: warm white or soft white strips are ideal for cosy, ambient lighting, while bright white strips work well for task lighting. RGB or colour-changing strips are great for adding a dynamic and vibrant look to your room.
Additionally, if you plan to install the lights in areas exposed to moisture, such as bathrooms or outdoor spaces, opt for waterproof LED strips. By grasping these considerations, you’ll be equipped to choose the perfect LED strip lights that meet your needs and significantly elevate the atmosphere of your living space.
How to Put up Led Lights – Conclusion
Installing LED strip lights is a fantastic way to enhance the ambiance and functionality of your home with energy-efficient and versatile lighting. By following this guide on how to put LED lights up, you can install LED strip lights confidently and effortlessly transform any space.
From choosing the right strips and tools to measuring, cutting, and securing the lights, each step is designed to ensure a smooth and successful installation. Our tips help you avoid common pitfalls, ensuring your lights stay in place and work perfectly.
With thorough preparation and a keen eye for detail, you can achieve a polished outcome that enhances the lighting in your home. Enjoy the brilliant and customizable illumination that LED strip lights provide. Happy installing!
This article was created in collaboration with Lucas LED – https://lucasled.ie/