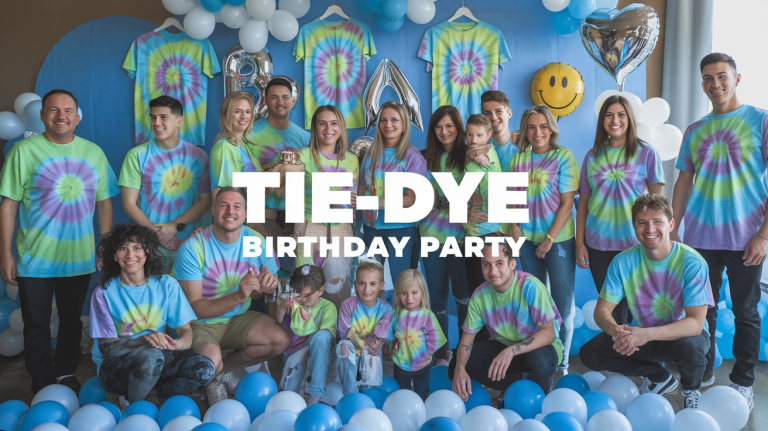
Planning a birthday celebration that keeps kids engaged can be challenging. Finding activities that are both fun and create lasting memories often feels impossible when you’re busy with party preparations.
A tie-dye party solves this problem by combining creative expression with hands-on fun that everyone enjoys.
This colorful activity keeps guests occupied while creating personalized souvenirs they’ll actually use.
This guide covers everything needed to host a successful tie-dye birthday party, from essential materials and step-by-step instructions to practical tips for minimizing mess and creative ideas to make your celebration even more special.
Why Kids Love Tie-Dye Birthday Parties?
Kids naturally gravitate to tie-dye birthday parties because they offer a perfect blend of creativity and tactile fun. Children enjoy the hands-on activity that lets them make actual design choices and see immediate, colorful results.
The element of surprise when unwrapping their creations adds excitement, while the take-home aspect gives them a wearable memory of the special day.
These parties also allow for personal expression within a structured activity, giving kids both freedom and guidance – a winning combination for birthday celebration joy.
Materials Required
Here’s everything you’ll need to gather for your tie-dye birthday party:
| Item | Purpose |
|---|---|
| Tie-Dye Party Kit | Contains dyes, rubber bands, gloves, table cover, and guide |
| 100% Cotton T-Shirts | The main item to dye (guests can bring their own) |
| Large Plastic Tablecloths | To protect tables and surfaces |
| Plastic Bins or Buckets | For dyeing and containing mess |
| Water Pitchers | Fill dye bottles and rinse items |
| Gallon-Size Sealable Bags | For storing dyed items while they set |
| Paper Towels | For drying hands and cleaning spills |
| Wet Wipes | For easy cleanup of hands and surfaces |
| Plastic Gloves | To protect hands from staining |
| Plastic Aprons or Old Shirts | To protect clothing during dyeing |
| Printable Wash Instructions Tags | Attach to finished items for take-home care info |
Optional extras:
- Plastic aprons for guests
- Printable care instruction tags
- Extra white items (socks, bandanas, tote bags)
- Hair ties or clips to keep hair away from the dye
- Timer for tracking dye setting periods
Diy Steps for A Tie-Dye Birthday Party
Throwing a tie-dye birthday party? Here’s a step-by-step guide to help you plan a colorful, mess-free, and memorable celebration!
Step 1: Start with The Right Tie-Dye Kit
Choose a complete kit, such as the Tulip One-Step Tie-Dye Party Kit, which includes dye bottles, rubber bands, gloves, and instructions. Quality kits ensure consistent colors and simplify the process for everyone.
Ensure your kit has enough supplies for all guests, plus extras for creativity. Also, enhance your kit with tablecloths, bins, aprons, water pitchers, and wipes to control messes and protect guests.
Step 2: Set Up the Tie-Dye Station
Cover tables with plastic cloths secured with tape to create an organized workspace. Arrange dye bottles by color group for easy selection.
Place water containers for rinsing and dampening shirts within reach. Set out gloves, rubber bands, and illustrated instructions in the sequence they’ll be used. A well-organized station prevents confusion and keeps the party flowing smoothly.
Step 3: Get the Shirts Ready
For best results, use 100% cotton white shirts, as cotton absorbs dye most effectively. If possible, pre-wash shirts to remove manufacturing chemicals. Have guests put on gloves and protective gear before handling shirts.
Most techniques require pre-dampening shirts with water, which helps colors spread and blend properly.
Step 4: Choose a Tie Dye Style
Show guests pattern options from your kit’s instruction booklet. Common designs include spirals (twist fabric into a circle and secure), stripes (fold accordion-style and secure at intervals), and bullseye patterns (pinch and secure at various points). Display finished examples for inspiration.
For younger children, prepare shirts by folding and securing them before the party. Older guests can try more complex patterns like hearts or peace signs.
Step 5: Apply Colors
With shirts folded and secured, guests can select their color combinations. Show how to apply dye directly to the fabric, working in sections for complete coverage. More dye creates brighter results, but avoid over-soaking.
Use individual plastic bins to contain mess and prevent color mixing. For young children, adults can help apply dye while kids direct color choices. The rubber bands create the white lines in the finished design.
Step 6: Seal and Store
Helped guests transfer their shirts into individual sealable plastic bags. This keeps the dye wet during the setting period (6-8 hours) and prevents premature drying that would result in lighter colors. The sealed bag also protects surfaces during transport.
Include care instruction tags: “Keep sealed in bag for 6-8 hours. Rinse in cold water until clear. Remove bands. Wash separately in hot water with mild detergent.” Label each bag with names.
Step 7: Clean and Celebrate
Clean up promptly while the dye is still wet. Collect and dispose of gloves, plastic coverings, and empty bottles. Wipe down surfaces with wet wipes and paper towels.
While the dye sets, move on to other birthday activities. Consider color-themed games, snacks, or crafts. When guests leave, remind parents about the care instructions for best results.
Video Tutorial
For more information, check out this video tutorial by TulipColorCrafts
9 Fun & Creative Ideas for A Tie-Dye Birthday Party
Turn your child’s birthday celebration into a hands-on color festival with these playful tie-dye party ideas that combine creativity, fun, and memorable keepsakes for all guests.
1. Tie Dye Station Zones
Instead of one big dye area, create multiple tie-dye stations, each focused on a different pattern—like spirals, crumples, stripes, or bullseye.
Set out sample images to inspire kids and let them move between stations to try different techniques. It makes the party feel more like a creative workshop!
2. Tie Dye T-Shirt Contest
Turn creativity into a challenge! Once everyone’s shirts are done, hold a friendly contest with silly awards like “Most Creative,” “Brightest Colors,” “Best Swirl,” or “Funniest Design.”
Let kids vote or assign a few “judges.” It’s a great way to celebrate everyone’s efforts and keep the excitement going.
3. Mini Tie-Dye Tote Bags
In addition to t-shirts, provide plain cotton tote bags or bandanas for guests to dye. They’re quick to color, dry faster, and can be used for books, snacks, or carrying party favors. Plus, they double as another fun memory to take home!
4. Color-Themed Dress Code
Encourage guests to come dressed in all-white or in bright, bold solids that match the tie-dye theme. This makes group photos pop and adds an extra festive feel. White clothes are also perfect for guests who want to try an extra dye project on the spot!
5. DIY Tie-Dye Cupcake Decorating
Bring the tie-dye fun to the snack table! Set up a cupcake station where kids can swirl colorful frosting or add rainbow sprinkles. Use vanilla icing with food coloring to create mini masterpieces that are just as fun to make as they are to eat.
6. Tie Dye Bingo Game
Create bingo cards with tie-dye terms, patterns, and party items (like “rubber bands,” “spiral,” “gloves,” or “bucket”).
Hand out small candies or stickers as bingo markers. It’s a great downtime activity while others are dying or waiting for their shirts to set.
7. Personalized Aprons
Start the party by giving each guest a plain white apron to decorate with fabric markers, iron-on patches, or even a little tie-dye.
Not only does it protect their clothes, but it also becomes a personalized souvenir they’ll love to wear again.
8. Music & Dance Corner
Keep the energy up with a tie-dye-themed dance space! Create a playlist full of upbeat, colorful songs and let kids dance it out between activities. You can even add a mini disco light or bubble machine to make it extra fun.
9. Color Splash Water Play (Outdoor Option)
If you’re hosting an outdoors party, end the party with a splash! Set up a color splash zone with water balloons, sprinklers, or color powder (safe and washable). It’s the perfect way to cool off and end the day with a burst of color and laughter.
Fun Extras to Level Up Your Tie Dye Party
Simple additions can make your tie dye party more exciting and memorable for everyone involved.
Colorful Photo Booth Area
Create a colorful photo-booth area with a white backdrop and bright props. This gives guests a perfect spot to capture memories while waiting for their turn to dye or between activities.
Use colorful streamers, balloons, and paper decorations to match the tie-dye theme.
Tie-Dye Inspired Treats
Serve tie-dye-inspired treats such as cupcakes with swirled frosting, rainbow fruit skewers, or multi-colored candy displays.
Use food coloring to create swirled patterns in vanilla frosting or make rainbow-layered gelatin cups for a fun snack that fits the theme.
DIY Party Favors
Prepare DIY party favors for guests to take home alongside their tie-dye creations.
Small bottles of bubbles, colorful wands, rainbow crayons, or other color-changing items make fitting additions to the theme.
Create personalized thank-you tags with care instructions for the dyed items to help parents properly wash and set the colors.
Conclusion
Hosting a tie-dye birthday party creates a celebration filled with color, creativity, and fun that children will remember long after the day ends. The combination of artistic expression and hands-on activity keeps everyone engaged while creating personalized keepsakes.
By following these steps and suggestions, you can host a successful tie-dye party without unnecessary stress or confusion. The key is proper preparation and organization before guests arrive.
We’d love to see how your tie-dye birthday party turns out! Share your photos and additional ideas in the comments below.
Your creative approaches might inspire other parents looking for birthday party activities that combine fun with lasting memories.
Remember, the beauty of tie-dye is in its unpredictability; each creation turns out equally special, just like each child at your celebration!

