Who knew that a simple sheet of paper and a box of crayons could turn a chaotic December afternoon into pure magic?
Christmas coloring pages are the unsung heroes of the holiday season, offering a peaceful escape from the shopping madness and endless to-do lists.
Whether you’re looking to keep little ones busy during winter break, searching for a calming activity after a hectic day of shopping, or wanting to create handmade decorations for your home, printable coloring pages are your secret weapon.
They’re budget-friendly, instantly accessible, and endlessly versatile.
From jolly Santas to delicate snowflakes, these festive designs capture the wonder and warmth of the season while giving everyone a chance to unplug and embrace their creative side.
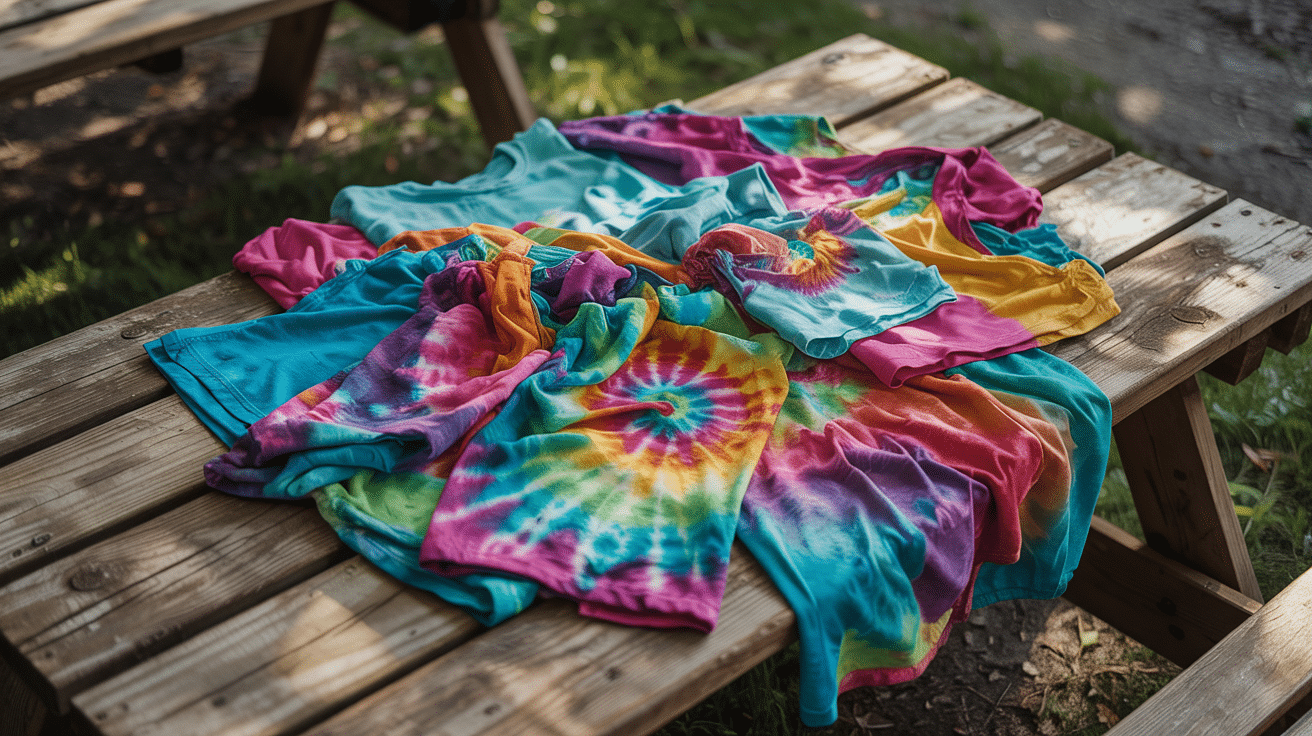
20 Festive Christmas Coloring Pages to Print and Enjoy
Get ready to unleash your creativity with this handpicked collection of Christmas-themed coloring pages.
Each design brings its own holiday charm, from classic characters to traditional symbols, giving you endless opportunities to add your personal artistic touch this season.
1. Santa Claus Delivering Presents
Watch Santa work his magic as he prepares to slide down chimneys with his bulging sack of toys and gifts for children.
2. Reindeer Flying Through the Night Sky
Rudolph and his friends soar across the moonlit sky, pulling Santa’s sleigh through clouds and twinkling stars on Christmas Eve.
3. Decorated Christmas Tree with Ornaments
A beautifully adorned evergreen tree stands tall with ornaments, tinsel, garland, and a shining star perched perfectly on top.
4. Snowman with Scarf and Hat
A cheerful snowman bundled up in winter accessories greets you with a carrot nose, coal buttons, and a warm, friendly smile.
5. Gingerbread Man Cookie
This adorable gingerbread man features icing decorations, candy buttons, and a sweet smile that’ll make anyone’s mouth water with delight.
6. Christmas Stocking Hung by the Fireplace
A festive stocking dangles from the mantel, ready to be filled with candy canes, small toys, and sweet surprises overnight.
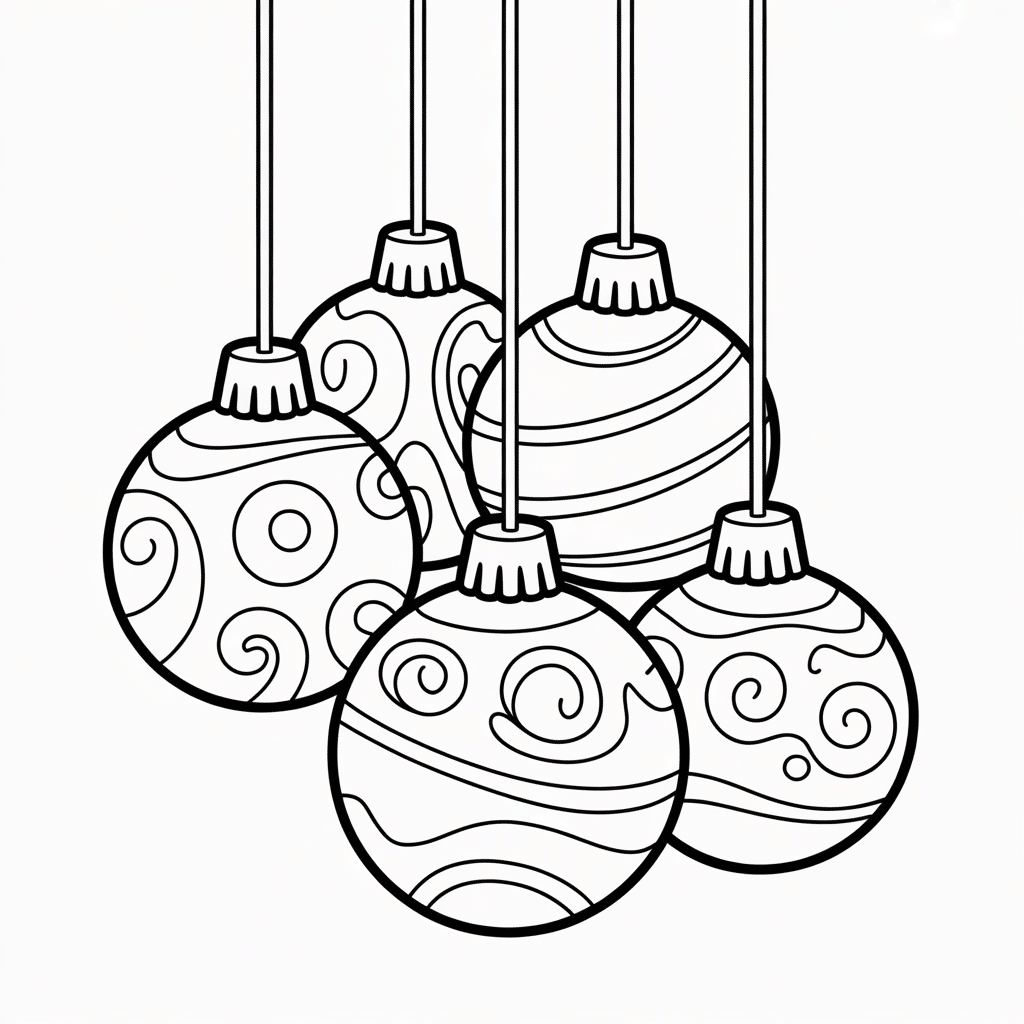
7. Elegant Christmas Ornament Baubles
Intricate glass baubles showcase detailed patterns, swirls, and designs perfect for practicing shading techniques and exploring different color combinations.
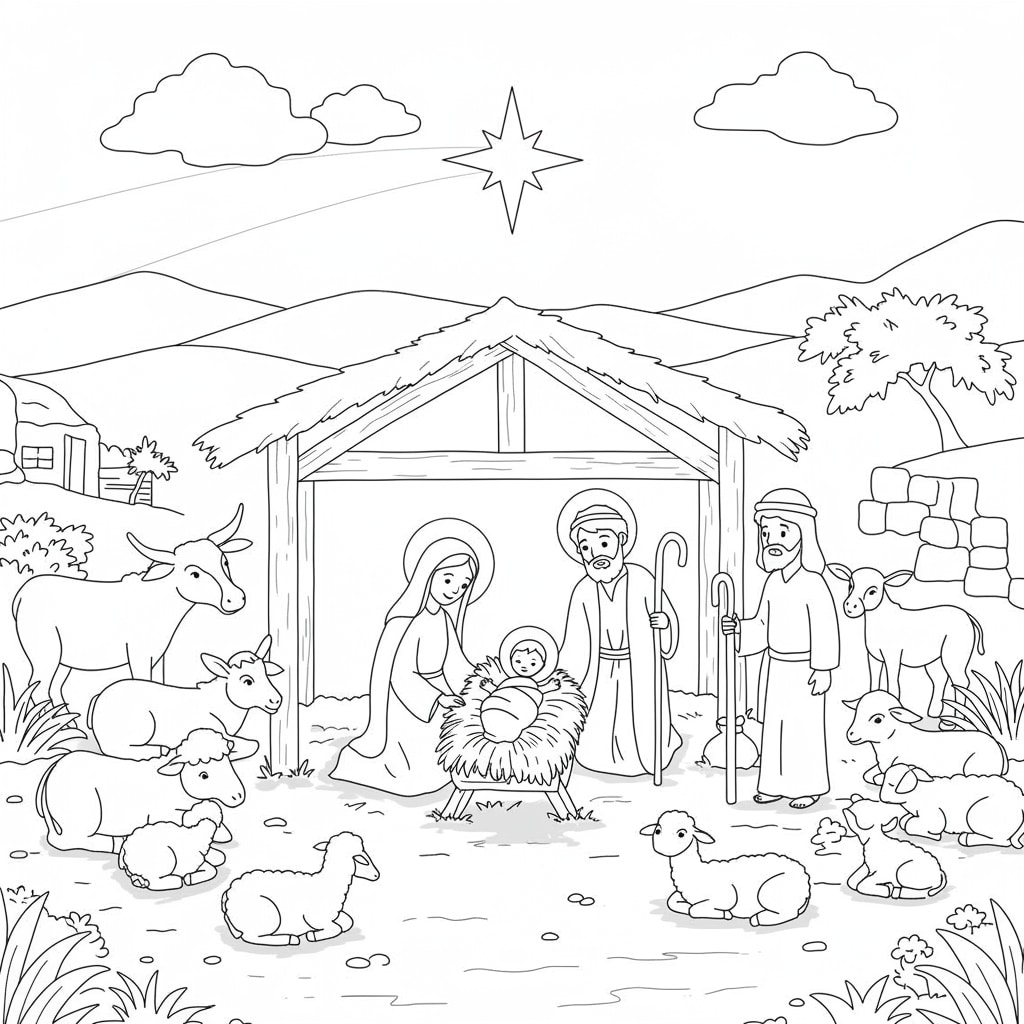
8. Nativity Scene with Baby Jesus
The holy night comes alive with Mary, Joseph, baby Jesus in the manger, shepherds, and animals gathered in peaceful worship.
9. Peppermint Candy Cane
Classic red and white striped candy canes twist into their iconic hook shape, representing one of Christmas’s most beloved treats.
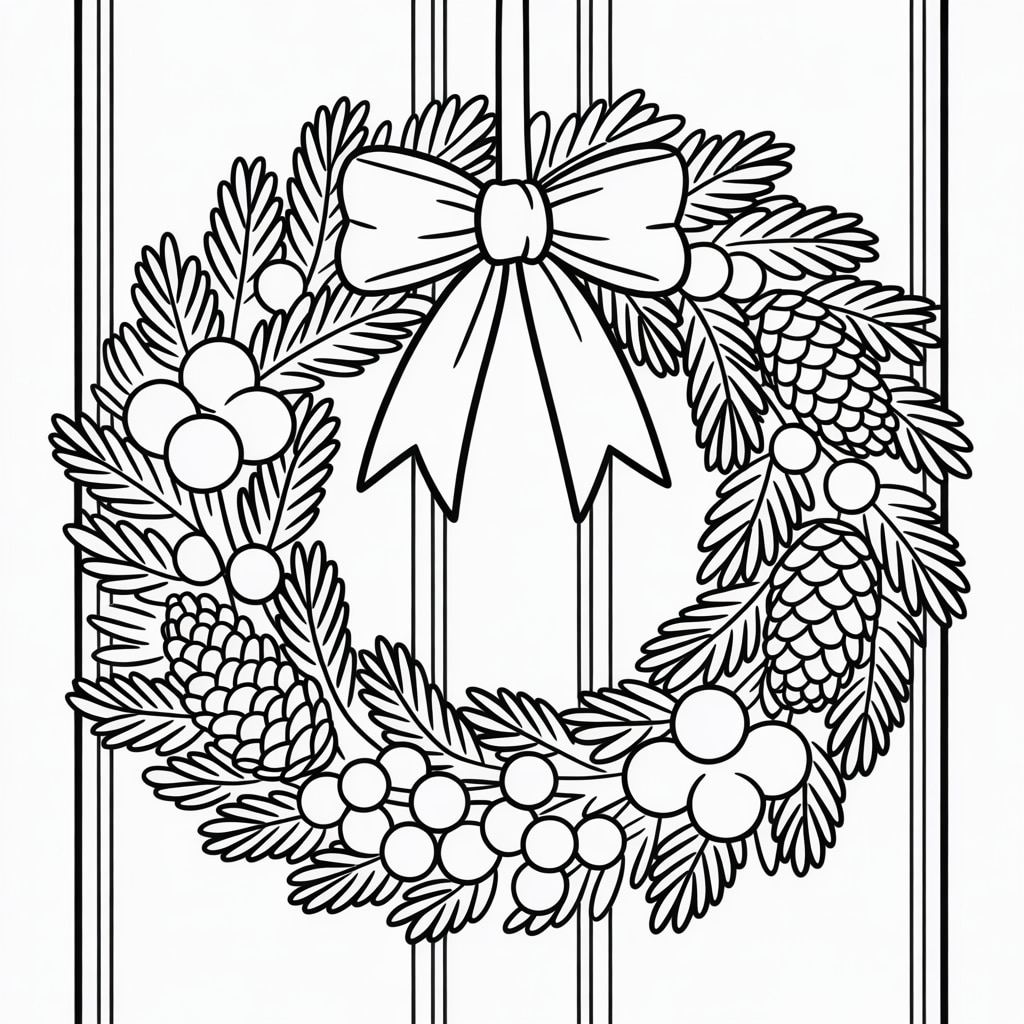
10. Christmas Wreath on Front Door
A lush evergreen wreath adorned with pine cones, ribbons, berries, and a big red bow welcomes guests to your holiday home.
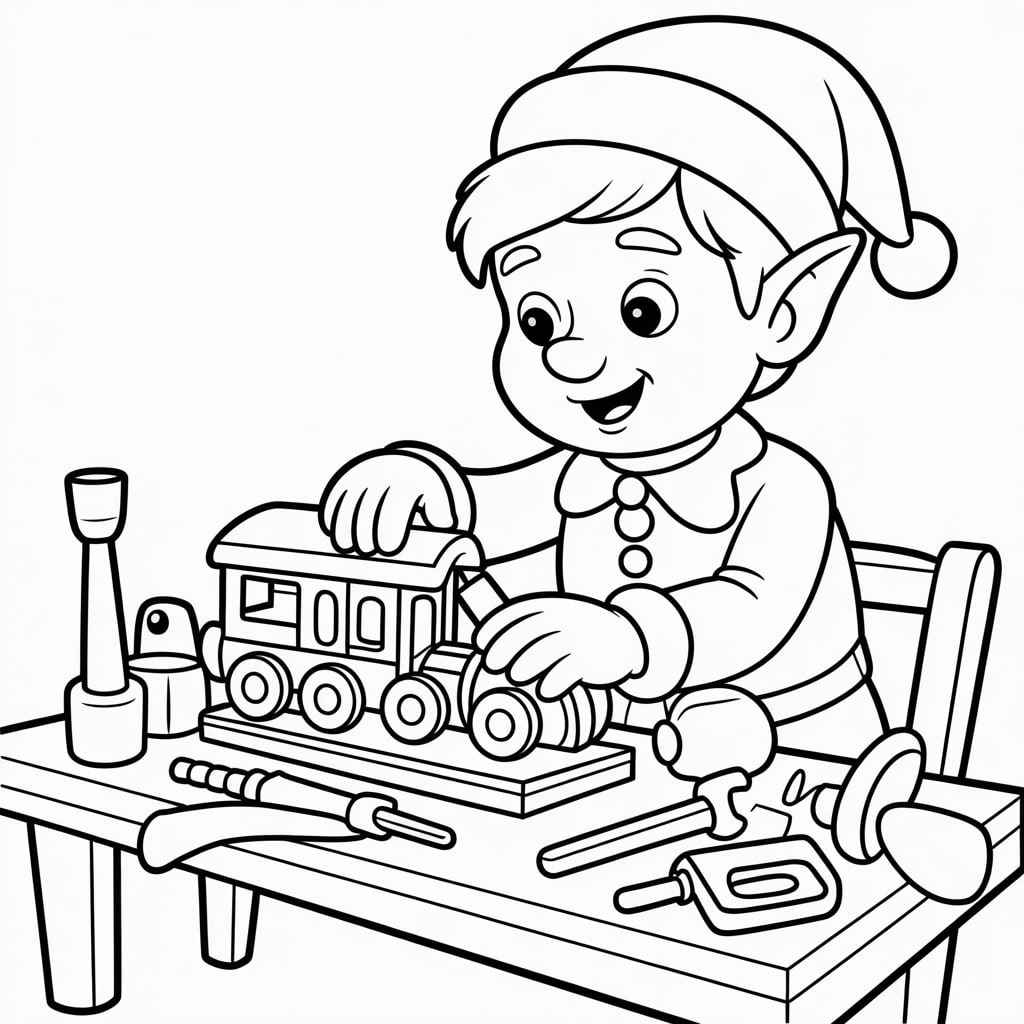
11. Busy Elf Making Toys in Workshop
Santa’s hardworking helper builds toys at a workbench surrounded by tools, paint, and unfinished presents in the North Pole workshop.
12. Sparkling Christmas Lights String
Colorful bulbs string together in festive patterns, ready to illuminate your coloring page with reds, greens, blues, and golden yellows.
13. Delicate Snowflakes Falling
Unique geometric snowflakes drift down from the sky, each one featuring intricate patterns and crystalline details waiting for color.
14. Wrapped Presents
Beautifully wrapped gift boxes of various sizes, topped with bows, ribbons, and decorative gift tags.
15. Jingling Christmas Bells
Shiny bells tied with ribbons create melodious holiday sounds, their metallic surfaces reflecting the joy and celebration of the season.
16. Graceful Angel with Wings
A heavenly angel spreads magnificent wings while holding a trumpet or harp, bringing messages of peace and joy to all.
17. Sweet Gingerbread House
A whimsical edible house features frosting details, gumdrop decorations, candy windows, and a roof covered in sugary snow-like icing.
18. Brilliant Christmas Star
The Star of Bethlehem shines brightly with pointed rays extending outward, guiding wise men and illuminating the holy night sky.
19. Festive Holly and Red Berries
Traditional holly leaves with their distinctive pointed edges surround clusters of bright red berries, symbolizing Christmas cheer and warmth.
20. Cozy Winter Mittens and Scarves
Warm winter accessories feature knitted patterns, stripes, snowflake designs, and festive colors, perfect for cold December days outdoors.
Conclusion
So there you have it, a treasure trove of festive designs just waiting for your personal touch!
These printable coloring pages aren’t just about keeping hands busy; they’re about creating memories, slowing down in our rushed world, and rediscovering the simple pleasure of choosing colors and staying inside the lines (or coloring outside them if that’s your style!).
Whether you’re a parent seeking screen-free activities, a teacher planning classroom fun, or simply someone who finds peace in coloring, these pages deliver pure holiday joy.
Don’t let another day pass without bringing these designs to life. Grab your favorite coloring tools, print a few pages, and let the creative magic begin.
Planning a celebration that stands out requires more than just sending invites and ordering appetizers.
The secret to hosting a gathering everyone remembers lies in choosing unique party themes for adults that match the crowd and create genuine excitement.
Today’s hosts are ditching cookie-cutter celebrations in favor of immersive experiences that give guests something to anticipate before they even walk through the door.
A well-executed theme streamlines planning decisions, from selecting music to choosing menu items, while naturally encouraging guests to participate and connect.
Whether marking a milestone birthday, celebrating a seasonal occasion, or simply bringing friends together, the right theme changes any space into something special and gives everyone a shared experience worth talking about long after the night ends.
Unique Party Themes for Adults That Will Wow Your Guests
From elegant soirées to playful celebrations, these carefully curated themes offer something for every style, budget, and occasion.
Each brings its own distinctive atmosphere and provides guests with an experience beyond typical gatherings.
1. Masquerade Ball
A masquerade ball brings elegance and mystery together in one sophisticated package. Guests arrive wearing elaborate masks and formal attire, creating intrigue and glamour while the anonymity encourages mingling.
Tips for a Successful Party:
Provide extra masks at the entrance for guests who forget theirs
Use candlelight and rich jewel-tone decorations with classical or jazz music
Set up a photo booth with ornate props
2. Murder Mystery Dinner
Murder mystery dinners turn guests into active participants in an unfolding whodunit story. Everyone receives a character assignment and works together to solve the crime while enjoying a meal.
Tips for a Successful Party:
Purchase a quality murder mystery kit for smooth gameplay
Send character descriptions in advance for costume preparation
Arrange seating strategically to facilitate clue-sharing
3. 1920s Speakeasy
Transport guests back to the Prohibition era with flapper dresses, fedoras, and jazz music. Secret passwords and hidden entrances add authenticity to this underground club experience.
Tips for a Successful Party:
Serve classic cocktails like sidecars and French 75s in vintage glassware
Transform the entrance with a “secret” knock or password requirement
Create a playlist featuring Duke Ellington and Louis Armstrong
4. Tropical Tiki Luau
A tiki luau brings island paradise vibes to any location, regardless of the weather outside. Hawaiian shirts, grass skirts, and flower leis set the vacation mood.
Tips for a Successful Party:
Create tiki cocktail stations with rum-based drinks and tropical garnishes
Use bamboo, tropical flowers, and tiki torches for décor
Organize limbo contests or hula hoop competitions
5. Casino Night
Bring Las Vegas excitement home with poker, blackjack, roulette, and other gambling games using fake money or chips.
Tips for a Successful Party:
Rent professional casino equipment and consider hiring dealers
Give each guest equal starting play money, with prizes for the top winners
Encourage cocktail attire or Vegas glamour dress code
6. Decades Dance Party
Pick a favorite decade and commit fully to its music, fashion, and cultural touchstones. Whether choosing the groovy seventies, neon eighties, or grunge nineties, nostalgia drives this celebration.
Tips for a Successful Party:
Research the chosen decade for authentic slang and cultural references
Curate a playlist exclusively featuring hits from that era
Share outfit inspiration photos with invitations
7. Wine and Paint Night
Combine creativity with relaxation as guests create their own masterpieces while sipping their favorite vintages. No artistic experience is necessary.
Tips for a Successful Party:
Hire a local artist for instruction or use projected online tutorials
Set up individual spaces with canvases, brushes, paints, and aprons
Pair wine selections with the painting’s theme
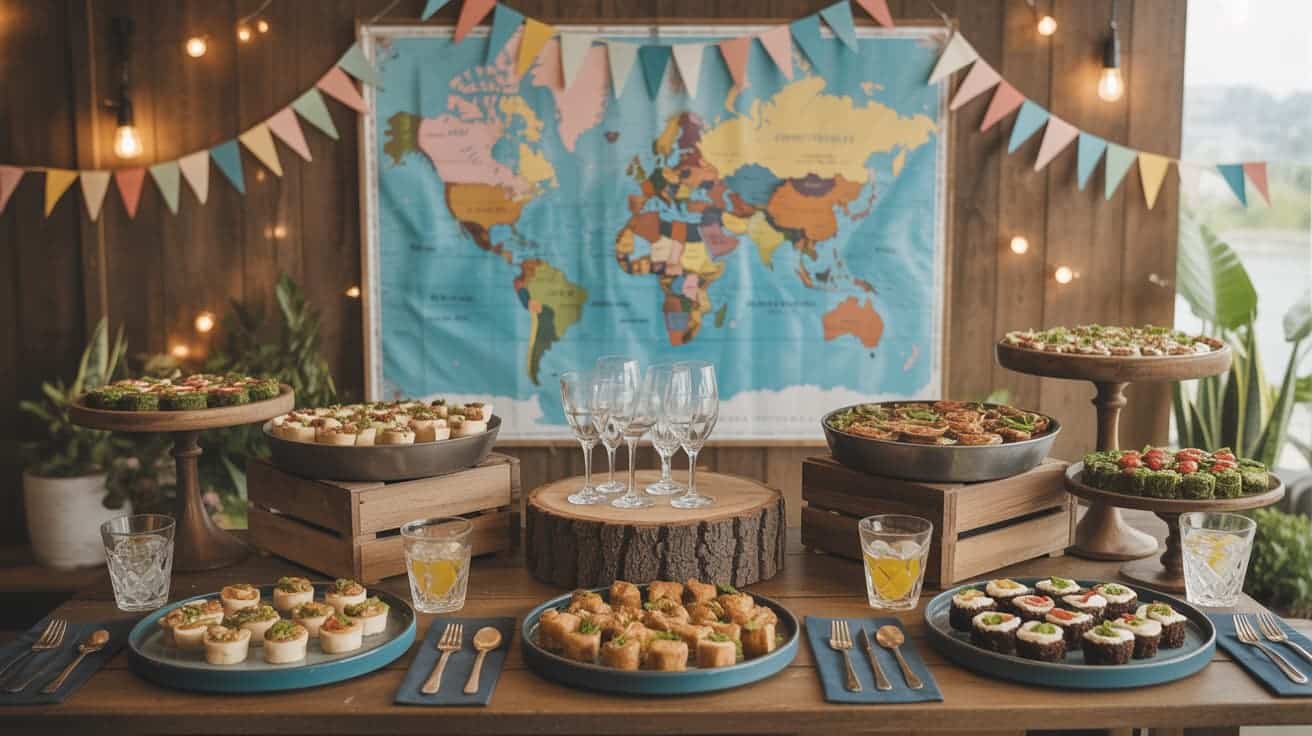
8. Around the World
Take guests on a culinary journey featuring foods, drinks, and decorations from various countries. Each room or station represents a different destination.
Tips for a Successful Party:
Designate areas as specific countries with appropriate decorations and authentic dishes
Provide “passports” that get stamped at each destination
Create an internationally-inspired cocktail menu
9. Black and White Ball
The elegance of a black and white color scheme creates instant sophistication and photographic perfection. Guests dress exclusively in these classic colors while all elements follow the monochromatic theme.
Tips for a Successful Party:
Strictly enforce the dress code for visual cohesion
Serve black sesame desserts, white chocolate treats, and checkerboard patterns
Use dramatic lighting to emphasize color contrast
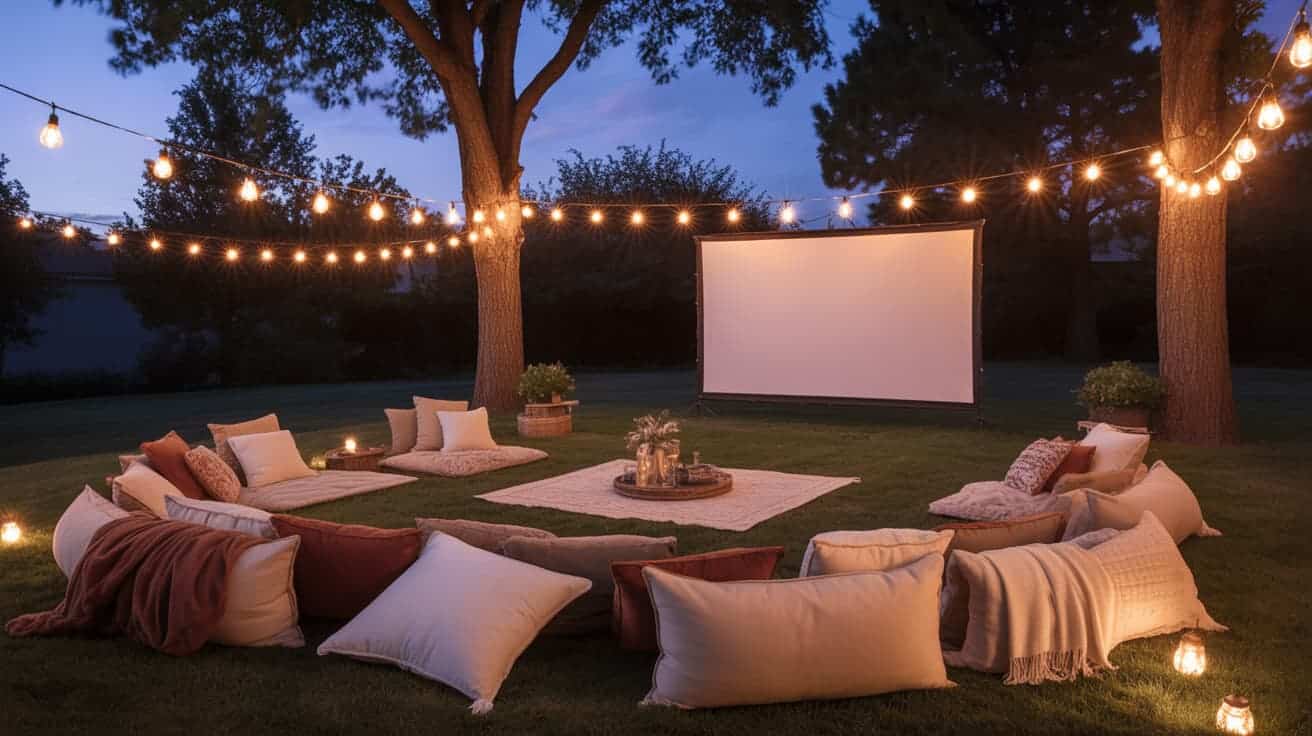
10. Outdoor Movie Night
Transform a backyard into an open-air cinema complete with a large screen, cozy seating, and classic movie theater snacks.
Tips for a Successful Party:
Test the projector and screen equipment thoroughly beforehand
Provide blankets, pillows, and lawn chairs arranged theater-style
Offer popcorn with various toppings and candy boxes
11. Enchanted Garden
Create a magical forest atmosphere with abundant greenery, twinkling lights, and whimsical decorations inspired by fairy tales.
Tips for a Successful Party:
String fairy lights throughout the space for an ethereal ambiance
Incorporate moss, flowers, branches, and stones into décor
Serve botanical cocktails with herbs and edible flowers
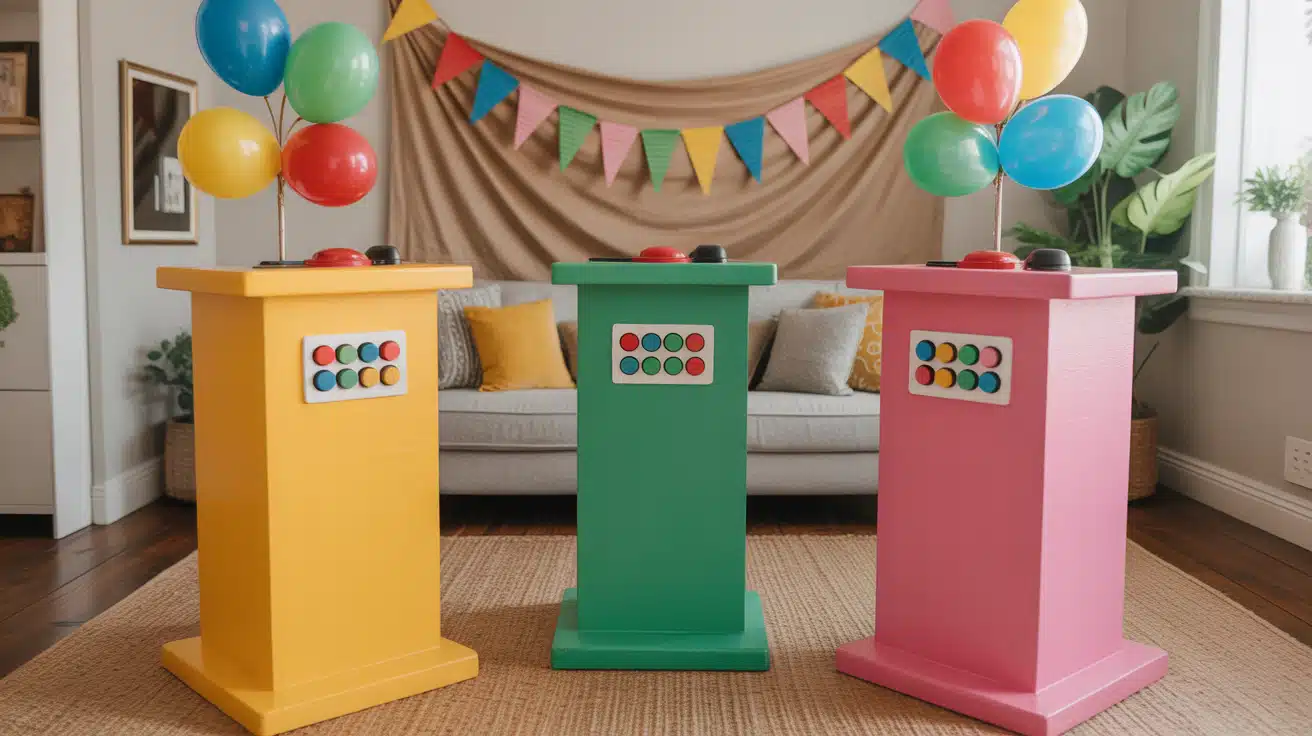
12. Game Show Spectacular
Recreate favorite television game shows with guests competing in teams or individually for prizes.
Tips for a Successful Party:
Mix game formats appealing to trivia knowledge, physical ability, and creativity
Designate a host to keep games moving with high energy
Award prizes throughout the evening
13. Superhero Soirée
Let guests unleash their inner heroes by dressing as their favorite comic book characters or creating original superhero personas.
Tips for a Successful Party:
Decorate with comic book-style graphics and action words
Create a villain that guests must defeat through challenges
Set up a backdrop for signature superhero power poses
14. Chocolate and Champagne Tasting
Pair premium chocolates with various champagnes and sparkling wines for a sophisticated sensory experience.
Tips for a Successful Party:
Research proper pairing principles or hire a sommelier
Offer chocolates from dark to white and champagnes from brut to rosé
Provide tasting cards for recording favorite combinations
15. Mystery Destination
Keep the party location secret until the last moment by giving guests clues leading to the venue.
Tips for a Successful Party:
Provide clear but cryptic clues that gradually reveal the location
Choose a venue that will genuinely surprise guests
Have backup communication for anyone who gets lost
16. Boho Chic Gathering
Channel free-spirited bohemian vibes with macramé, dreamcatchers, floor cushions, and flowing fabrics.
Tips for a Successful Party:
Create intimate seating areas with low tables and floor pillows
Serve mezze platters and shareable dishes
Curate folk, indie, and world music playlists
17. Neon Glow Party
Turn down the lights and turn up the fun with blacklights, neon decorations, and glow-in-the-dark accessories.
Tips for a Successful Party:
Test blacklights beforehand for adequate space coverage
Provide glow sticks, neon body paint, and UV-reactive accessories
Use tonic water in cocktails for a natural blacklight glow
18. Farm-to-Table Dinner
Celebrate local agriculture and seasonal ingredients with a rustic dinner highlighting fresh, quality components.
Tips for a Successful Party:
Source ingredients from farmers’ markets with origin information displayed
Use burlap, wooden crates, and fresh produce as decorations
Create seasonal menus showcasing currently available ingredients
19. Pajama Brunch
Host a late-morning party where guests arrive in their favorite sleepwear for a cozy, intimate gathering.
Tips for a Successful Party:
Specify cute matching sets rather than old sleepwear
Serve pancakes, eggs Benedict, and morning cocktails like mimosas
Set up lounging areas with plush blankets and pillows
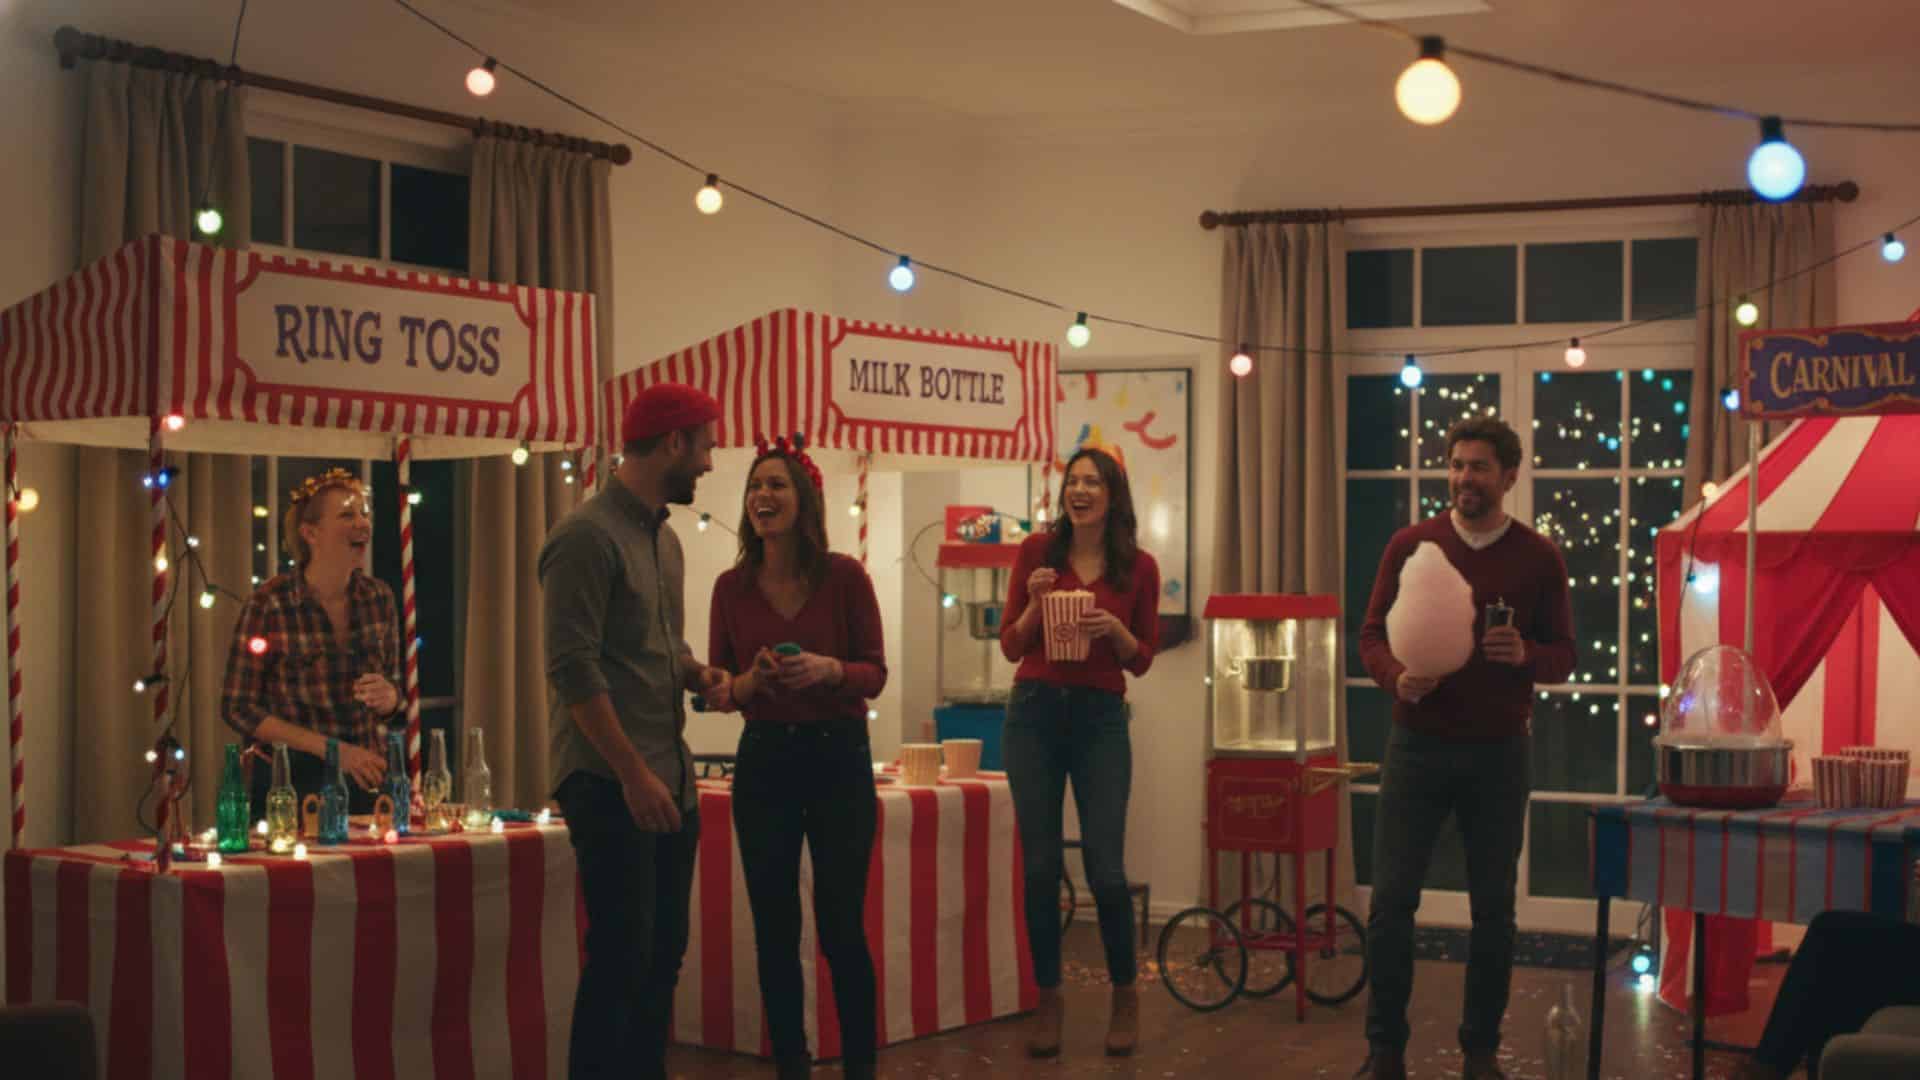
20. Carnival Extravaganza
Bring county fair excitement with classic carnival games, popcorn stands, and colorful decorations.
Tips for a Successful Party:
Set up ring toss, balloon darts, and bean bag throw with prizes
Serve popcorn, cotton candy, and funnel cakes
Hire face painters or balloon artists
21. Literary Salon
Create an intellectually stimulating environment where guests dress as their favorite book characters or authors and discuss literature.
Tips for a Successful Party:
Choose a specific book, author, or genre to focus discussions on
Create a reading nook with comfortable seating and book displays
Serve refreshments matching the literary theme or time period
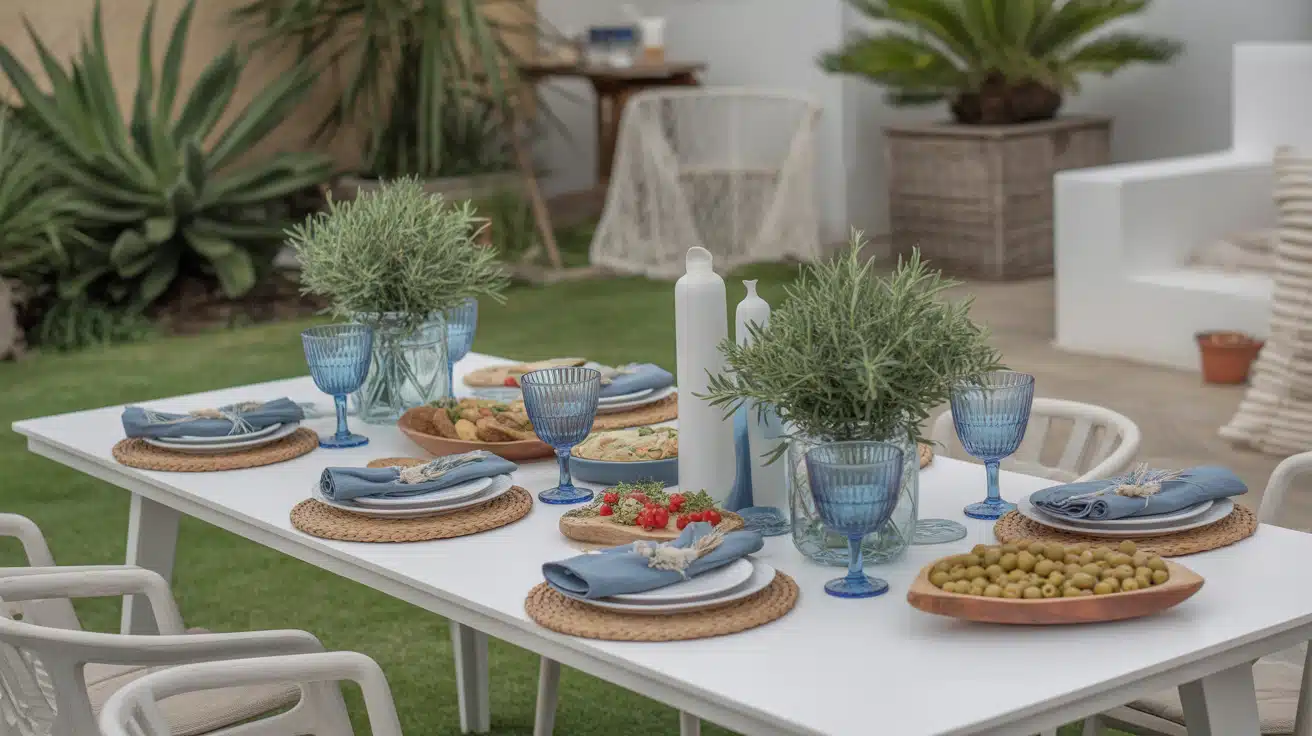
22. Mediterranean Escape
Transport guests to sun-drenched coastlines with Greek and Italian-inspired food, décor, and music.
Tips for a Successful Party:
Serve hummus, tzatziki, olives, grilled vegetables, and seafood
Decorate with white tablecloths, blue accents, and fresh lemons
Play Greek bouzouki music and Italian tarantellas
23. Rooftop Sunset Celebration
Host a sophisticated gathering timed to coincide with golden hour and sunset for natural beauty.
Tips for a Successful Party:
Time for guests to arrive before sunset
Provide seating with unobstructed views and heat lamps or blankets
Serve easy-to-eat cocktails and appetizers
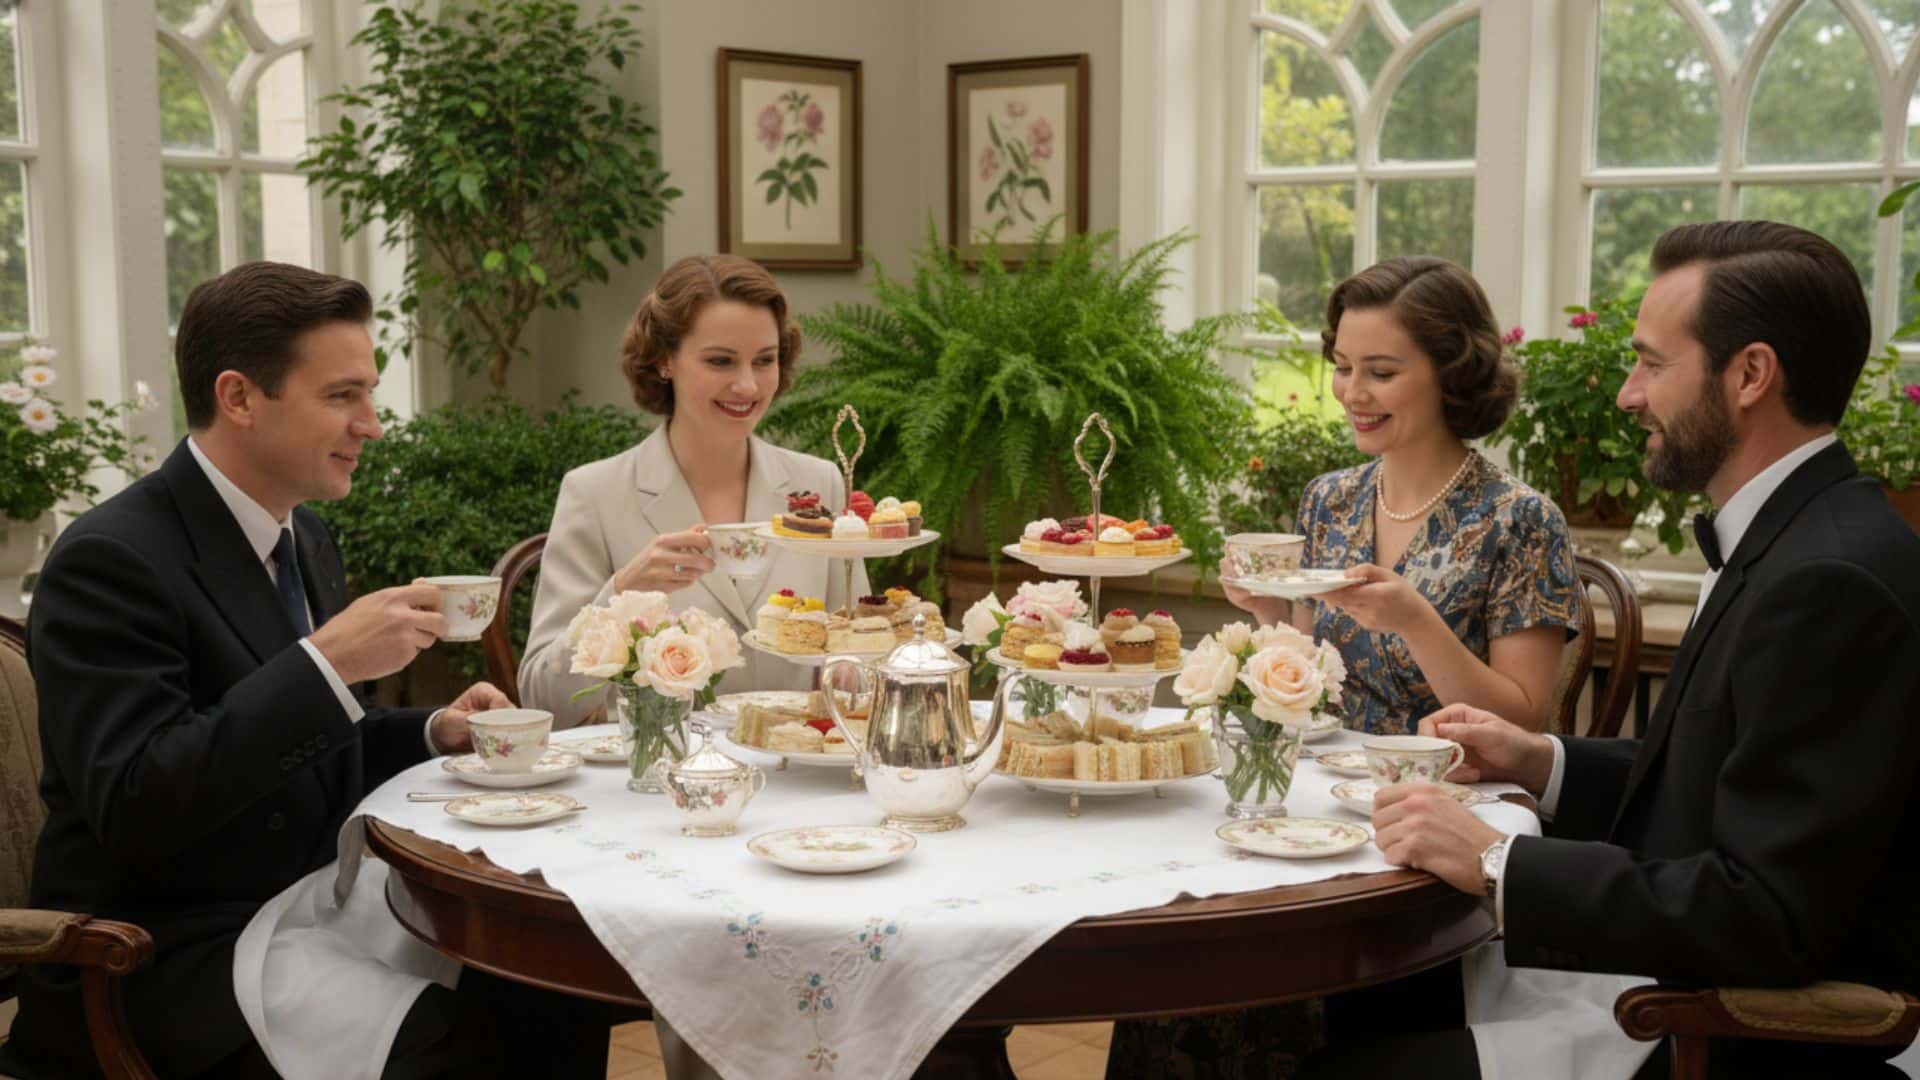
24. Vintage Tea Party
Host a proper afternoon tea featuring delicate china, tiered servers, and an assortment of teas and pastries.
Tips for a Successful Party:
Source or rent vintage teacups and serving pieces
Offer tea varieties from black teas to herbal infusions
Prepare cucumber sandwiches, scones with clotted cream, and petit fours
25. Stargazing Soirée
Host an evening under the stars where guests observe constellations and planets through telescopes while enjoying cosmic-themed refreshments.
Tips for a Successful Party:
Check astronomy calendars for meteor showers or planetary alignments
Provide telescopes, star maps, and astronomy apps
Serve space-themed treats and galaxy-inspired cocktails
How to Choose the Perfect Theme for Your Event?
Before diving into specific theme ideas, understanding how to select the right one ensures the celebration resonates with everyone involved. Consider these essential factors when making the decision:
Consider Your Guest List: Think about the personalities, interests, and comfort levels of the people attending. A group of extroverted performers might thrive at a karaoke night, while introverted book lovers would prefer a literary salon.
Evaluate Your Budget: Some themes require significant investment in decorations, rentals, and specialty items, while others rely primarily on creativity and resourcefulness.
Match the Venue: The location significantly impacts which themes work best. Outdoor spaces naturally accommodate tropical luaus and movie nights, while intimate indoor settings suit murder mysteries and wine tastings. Consider the size, layout, and existing ambiance when narrowing down options.
Align with the Occasion: The reason for gathering influences the theme appropriateness. Milestone birthdays call for something personalized to the guest of honor’s interests, while casual friend gatherings allow for more experimental or quirky concepts.
Assess Your Planning Capacity: Be realistic about available time and organizational skills. Elaborate themes like murder mysteries require preparation and coordination, while simpler concepts like decades parties need less logistical complexity.
With these considerations in mind, selecting from the following theme options becomes much easier and ensures a celebration that delights both host and guests alike.
Conclusion
Selecting from these unique party themes for adults means moving beyond generic gatherings and creating celebrations tailored to specific groups and occasions.
The difference between a forgettable event and one guests discuss for months comes down to thoughtful theme selection and committed execution.
Hosts who dare to try something different discover that themed parties require no more effort than traditional ones, just redirected creativity.
Start by identifying what resonates most with the intended guest list, then build from there with confidence.
Whether planning an intimate dinner or a large-scale bash, these unique party themes for adults offer the perfect starting point.
Change the next celebration into something distinctive by choosing a theme today and watching how it brings people together in unexpected, delightful ways that standard parties cannot match.
The final countdown to midnight brings an electric energy that transforms ordinary evenings into memorable celebrations.
Whether someone prefers glittering gatherings or cozy reflections, the transition into a fresh year offers countless opportunities to create meaningful memories.
From time-honored traditions passed down through generations to innovative celebrations that break the mold, there’s something magical about marking this universal moment of renewal.
The beauty lies not just in the celebration itself but in the intention behind it.
Setting the tone for the months ahead starts with choosing activities that resonate with personal values and aspirations, making this night more than just another party on the calendar.
New Year’s Activities to Celebrate and Start Fresh
From spirited gatherings to quiet moments of reflection, these New Year’s activities cater to every celebration style and help set positive intentions for the coming year.
Classic Celebrations
These tried-and-true activities bring people together through shared traditions, festive atmospheres, and the communal joy of marking midnight as one.
1. Host a Themed Costume Party
Throwing a themed costume party transforms a standard gathering into an immersive experience.
Guests can dress according to decades, like the roaring twenties or groovy seventies, or follow creative themes like future visions or favorite movie characters.
The costumes become instant conversation starters and create photo opportunities that will be cherished for years.
Making It More Successful: Send invitations three weeks in advance with clear theme guidelines and inspiration boards. Set up a designated photo booth area with props related to the theme, and consider offering a prize for the most creative costume to encourage participation.
2. Attend a Public Countdown Event
Major cities and local communities organize spectacular countdown events featuring live music, fireworks, and communal celebrations.
These gatherings offer the chance to be part of something bigger, surrounded by fellow revelers sharing the same anticipation and joy.
The collective energy of thousands counting down together creates an experience worth remembering.
Making It More Successful: Arrive early to secure good viewing spots and familiarize oneself with the venue layout. Dress in layers for changing temperatures, bring portable phone chargers, and establish a meeting point in case the group gets separated in the crowd.
3. Organize a Potluck Dinner Party
A potluck dinner party brings together diverse flavors and takes pressure off a single host. Each guest contributes a dish, creating a feast that represents everyone’s culinary talents and cultural backgrounds.
The variety ensures there’s something for every palate while fostering a communal spirit.
Making It More Successful: Create a shared online document where guests can claim dishes to avoid duplicates. Provide serving utensils, labels for dishes with ingredient lists for those with allergies, and keep the oven available for guests who need to reheat items.
4. Watch Fireworks Displays
Fireworks paint the night sky with brilliant colors and patterns, creating visual poetry that marks the year’s transition.
Viewed from a rooftop, beach, or designated viewing area, these displays offer a spectacular sensory experience that captivates people of all ages.
Making It More Successful: Research the viewing points in advance and arrive early to claim spots. Bring blankets, hot beverages in thermoses, and consider downloading a stargazing app to identify constellations between displays.
5. Create a Champagne Toast Tradition
A champagne toast represents celebration and new beginnings, with effervescent bubbles symbolizing joy and hope.
Gathering loved ones for a synchronized toast at midnight creates a moment of unity and shared optimism for the coming year.
Making It More Successful: Offer non-alcoholic sparkling alternatives like sparkling cider or fancy mocktails so everyone can participate. Prepare a heartfelt toast in advance that reflects on the past year and expresses hopes for the future, making the moment more meaningful.
Reflective and Meaningful Activities
These thoughtful practices encourage introspection, gratitude, and intentional goal-setting to start the year with clarity and purpose.
6. Write Letters to Future Self
Penning letters to one’s future self creates a time capsule of current thoughts, dreams, and perspectives.
These letters serve as powerful reminders of where someone was mentally and emotionally, offering insights when opened a year later about personal growth and changing priorities.
Making It More Successful: Provide prompts like current goals, favorite memories from the past year, and predictions for the future. Seal letters in dated envelopes and store them somewhere visible as a reminder to open them next New Year’s Eve.
7. Create a Vision Board Together
Vision boards transform abstract goals into visual representations through images, words, and symbols.
Gathering friends or family to create these boards together builds accountability and support while sparking conversations about aspirations and dreams.
Making It More Successful: Stock up on diverse magazines, printed images, markers, glitter, and large poster boards. Play inspiring music and create stations for different life categories like career, health, relationships, and personal growth.
8. Host a Gratitude Circle
A gratitude circle invites participants to share what they’re thankful for from the past year.
This practice shifts focus from what went wrong to what brought joy, fostering positive emotions and deeper connections among participants.
Making It More Successful: Set a respectful tone by going first and sharing something genuinely meaningful. Keep a talking stick or object to pass around, ensuring everyone gets uninterrupted time to share, and keep tissues handy for emotional moments.
9. Perform a Burning Bowl Ceremony
The burning bowl ceremony involves writing down things to release from the past year on paper, then safely burning them.
This symbolic act represents letting go of negativity, regrets, or outdated patterns, making space for fresh starts.
Making It More Successful: Use a fireproof bowl or small outdoor fire pit in a safe location. Provide small pieces of paper and pens, and remind participants to reflect quietly before writing. Have water nearby for safety and consider saying individual or collective affirmations as papers burn.
10. Start a New Year’s Journal
Beginning a dedicated journal for the new year creates a space for documenting experiences, processing emotions, and tracking progress toward goals.
The blank pages represent possibility and provide a private sanctuary for honest self-expression.
Making It More Successful: Choose a journal that feels special and inviting to use regularly. Write the first entry on New Year’s Eve about intentions and feelings, then set a realistic routine like weekly entries rather than daily to avoid overwhelming pressure.
Active and Adventurous Options
For those who prefer movement and excitement, these high-energy activities combine physical challenges with celebratory fun.
11. Take a Midnight Hike
A midnight hike offers a unique perspective on familiar trails, with darkness adding mystery and the night sky providing natural beauty.
Reaching a summit or viewpoint at midnight creates a decisive symbolic moment of ascending into the new year.
Making It More Successful: Scout the trail during daylight first and bring multiple light sources, including headlamps and flashlights. Hike with a group for safety, dress warmly in layers, and pack hot drinks and snacks for the summit celebration.
12. Go Ice Skating Under the Stars
Ice skating combines physical activity with winter magic, especially when done outdoors under twinkling lights or stars.
The graceful gliding and occasional tumbles create laughter and bonding moments that embody the playful spirit of celebration.
Making It More Successful: Check rink hours in advance as many extend hours for the holiday. Wear warm, flexible clothing and bring extra socks. For beginners, arrive earlier when rinks are less crowded and consider holding a buddy’s hand or using a skating aid.
13. Host a Glow-in-the-Dark Dance Party
A glow-in-the-dark dance party transforms any space into a vibrant, energetic celebration.
Black lights, neon decorations, and glow sticks create an otherworldly atmosphere where guests can dance freely and express themselves without inhibition.
Making It More Successful: Hang black lights strategically and encourage guests to wear white or neon colors that glow. Provide glow sticks, face paint, and neon accessories at the entrance. Create a playlist mixing upbeat classics with current hits to keep energy high.
14. Participate in a Polar Plunge
A polar plunge involves plunging into cold water, often the ocean or a lake, as a thrilling way to shock the system into the new year.
This adrenaline-pumping tradition symbolizes courage, renewal, and the willingness to accept discomfort for growth.
Making It More Successful: Research organized polar plunge events that have safety measures in place. Warm up beforehand with light exercise, have dry clothes and towels immediately accessible, and bring a thermos of hot beverage. Never do this alone and enter the water gradually.
15. Plan a Sunrise Hike
Starting the new year by watching the first sunrise offers a peaceful, contemplative way to mark the transition.
The quiet morning hours provide solitude for reflection while the rising sun symbolizes hope, warmth, and new beginnings.
Making It More Successful: Check sunrise times and weather forecasts, starting the hike with enough time to reach the viewpoint beforehand. Bring a thermos of coffee or tea, blankets to sit on, and consider packing a simple breakfast to enjoy while watching the spectacle.
Family-Friendly Fun
These inclusive activities ensure everyone, from young children to grandparents, can participate in the celebration and create lasting memories together.
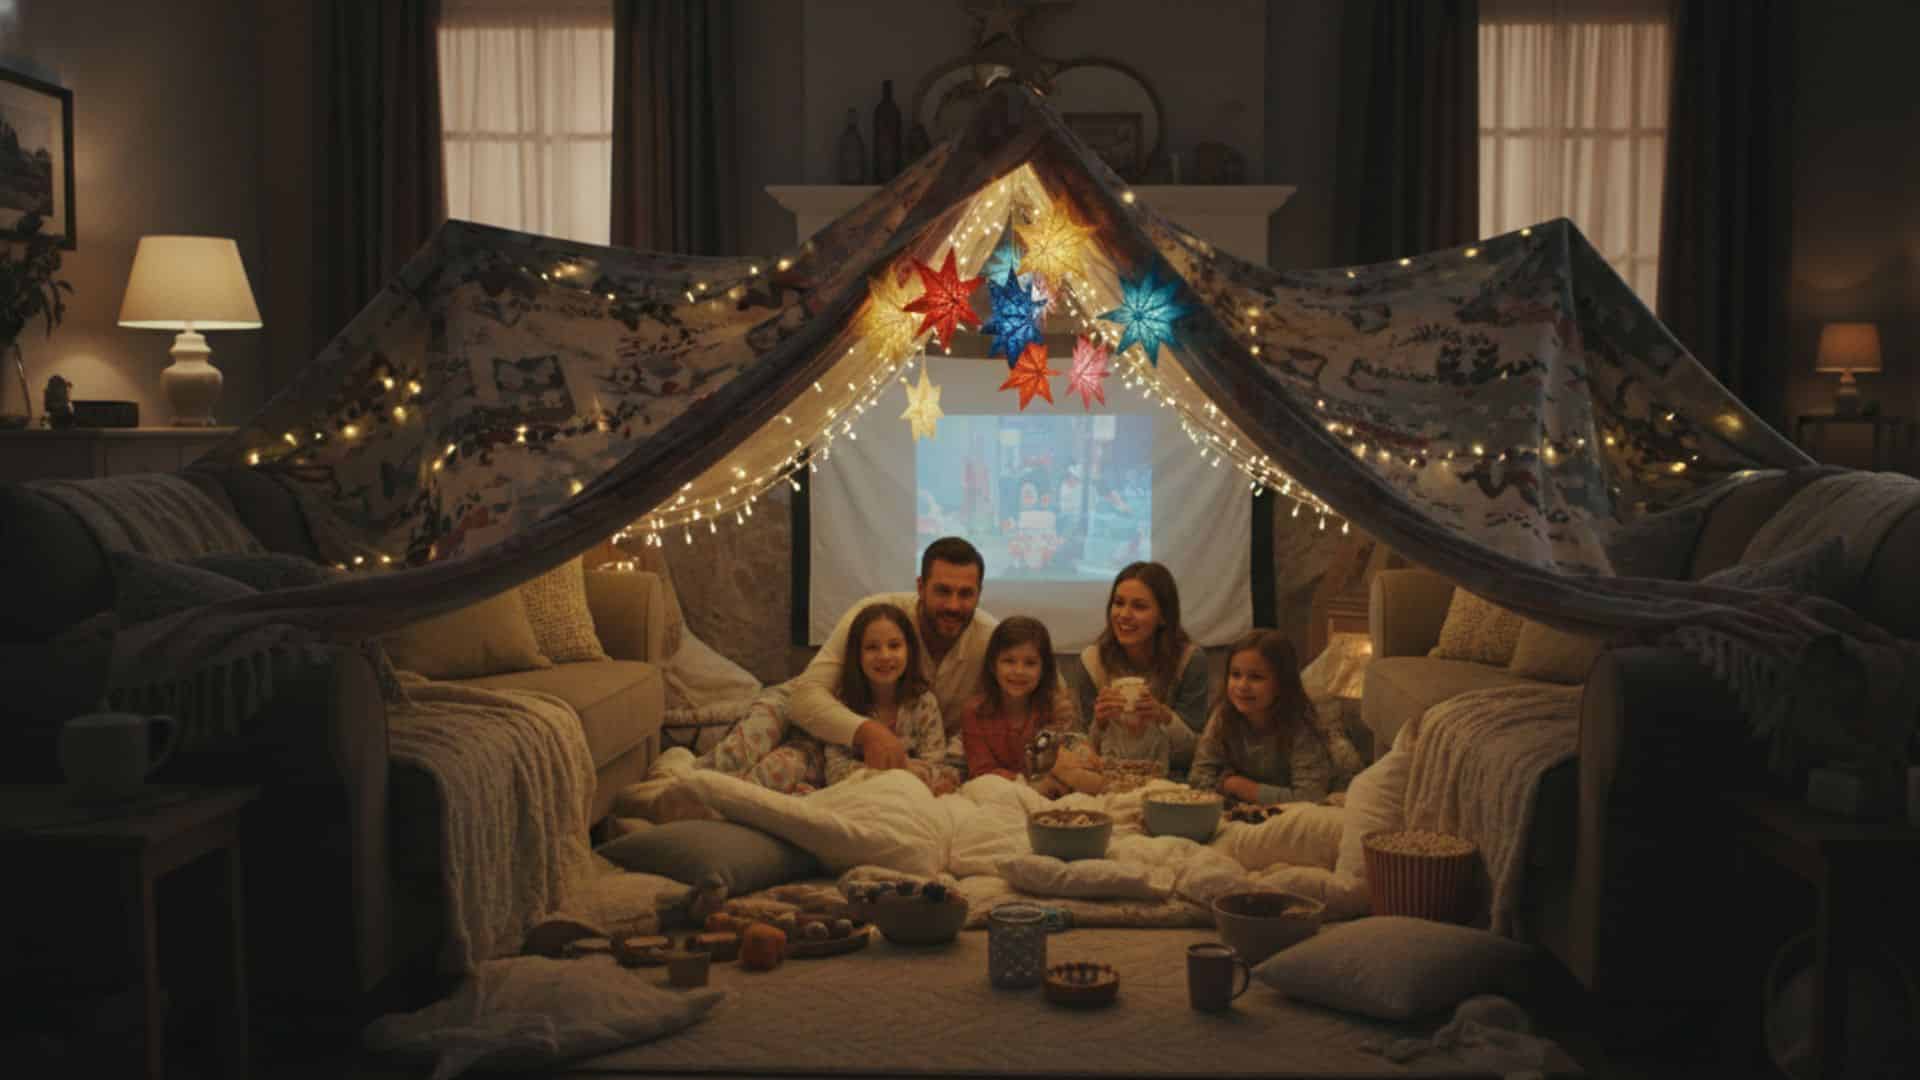
16. Build a Blanket Fort Movie Marathon
Constructing an elaborate blanket fort brings out everyone’s inner child while creating a cozy sanctuary for movie watching.
This activity combines creativity, teamwork, and comfort, perfect for families wanting to celebrate without leaving home.
Making It More Successful: Gather all available blankets, sheets, and pillows before starting construction. Use furniture, chairs, and clips to create structure and hang string lights inside for atmosphere. Prepare snacks in advance and let family members vote on the movie lineup.
17. Create a Time Capsule
Assembling a time capsule preserves memories, current events, and predictions for future opening.
Families can include photos, newspapers, handwritten notes, and small, meaningful objects that represent their lives at this moment in time.
Making It More Successful: Use a waterproof, durable container and include a detailed inventory list. Have each family member contribute items and explanations of their significance. Decide collectively when to open it and mark calendars for that future date.
18. Host a Game Tournament
A game tournament featuring board games, card games, or video games creates friendly competition and endless entertainment.
Rotating through different games keeps things interesting and allows various family members to showcase their strengths.
Making It More Successful: Create a bracket system for competitive games and offer small prizes or trophies. Mix strategy games with luck-based games so everyone has winning chances. Provide plenty of snacks and drinks, and set reasonable time limits per game.
19. Have a Baking and Decorating Contest
A baking contest lets family members channel creativity while making delicious treats.
Decorating cookies, cupcakes, or building gingerbread houses provides entertainment, and the results offer sweet rewards.
Making It More Successful: Prep all ingredients and supplies beforehand, creating individual stations for each participant. Set a theme or specific challenge like “most creative design” or “best use of color.” Take photos of finished creations before devouring them.
20. Countdown Around the World
Counting down to midnight in different time zones allows families to celebrate multiple times throughout the evening.
This activity teaches geography and global awareness while providing earlier bedtimes for younger children who can’t stay up until local midnight.
Making It More Successful: Research which countries celebrate first and create a schedule of countdowns. Learn a traditional New Year’s custom from each featured country and incorporate it into the celebration. Use streaming services to watch live countdown footage from different locations.
Creative and Unique Experiences
These inventive activities offer fresh twists on New Year’s celebrations, perfect for those seeking something different from the usual party format.
21. Host a Resolutions Workshop
A resolutions workshop guides participants through structured goal-setting processes, turning vague wishes into actionable plans.
This collaborative approach provides accountability, support, and practical strategies for achieving aspirations.
Making It More Successful: Provide worksheets with reflection questions and SMART goal templates. Break into small groups for sharing and feedback sessions. End with each person declaring their top three goals aloud and assigning accountability partners.
22. Organize a Talent Show
A talent show gives everyone a stage to showcase hidden abilities, whether singing, comedy, magic tricks, or unusual skills.
The supportive environment encourages vulnerability and creates memorable moments of surprise and delight.
Making It More Successful: Announce the talent show in advance so participants can prepare acts. Create a simple stage area with good lighting and designate an emcee to introduce performers. Keep performances under five minutes and ensure everyone receives enthusiastic applause.
23. Create DIY Party Favors
Crafting personalized party favors adds a thoughtful touch that guests will appreciate and remember.
These handmade gifts can include items like custom candles, bath salts, seed packets, or fortune cookies with personalized messages.
Making It More Successful: Choose projects that can be assembly-lined for efficiency. Gather supplies weeks in advance and recruit helpers for a crafting party before the main event. Package favors attractively and include tags explaining any homemade elements.
24. Plan a Progressive Dinner Party
A progressive dinner party moves between different homes for each course, turning the meal into an adventure.
This format showcases multiple hosting styles, shares preparation responsibilities, and keeps the evening lively and engaging.
Making It More Successful: Map out a logical route between homes and establish firm time windows for each course. Coordinate the menu so flavors complement each other and accommodate dietary restrictions. Arrange transportation for the group if alcohol will be served.
25. Host a Midnight Karaoke Session
Karaoke transforms guests into performers, creating hilarious and heartfelt moments as people belt out their favorite songs.
The activity breaks down social barriers and generates infectious energy perfect for ringing in the new year.
Making It More Successful: Invest in or rent quality karaoke equipment with a diverse song library. Create a signup sheet to avoid awkward lulls and encourage duets or group performances. Keep the atmosphere judgment-free and supportive, cheering for every performer regardless of skill level.
With these activities planned and anticipation building, the stage is set for a celebration that reflects personal style and values.
Conclusion
The transition into a new year deserves a celebration that reflects personal style and values.
From energetic dance parties to peaceful sunrise watches, the perfect way to welcome fresh beginnings exists for every personality and preference.
The magic lies not in expensive venues or elaborate productions but in the connections forged and intentions set.
The activities selected should reflect genuine desires rather than social pressures, creating space for real celebration.
As midnight approaches and the familiar countdown begins, the anticipation builds toward a moment of collective hope and possibility.
Start planning now, gather the people who matter most, and prepare to welcome the new year with intention, joy, and open hearts ready for whatever adventures lie ahead.
While everyone else is wrestling with demanding poinsettias that drop leaves at the slightest misstep, your Christmas cactus could be bursting with brilliant blooms without all the drama.
That’s the magic of a Christmas cactus, and here’s the best part: caring for this stunning plant is far easier than you might think.
Unlike its prickly desert cousins that demand constant attention and specific conditions, the Christmas cactus thrives with just a bit of knowledge and consistency.
Whether you’re a seasoned plant parent or just starting your indoor garden journey.
This guide will walk you through everything you need to change your Christmas cactus into a blooming showstopper that returns year after year.
What is a Christmas Cactus?
The Christmas cactus, scientifically known as Schlumbergera, originates from the coastal mountains of Brazil, where it grows nestled in trees rather than desert sand.
This tropical heritage explains everything about its care needs: it craves humidity, indirect light, and regular moisture, unlike its drought-loving desert relatives.
You’ll recognize this plant by its distinctive flat, segmented stems with scalloped edges that cascade beautifully from pots. These aren’t actually leaves but modified stems that can grow quite long, creating a beautiful draping effect perfect for hanging displays.
The real magic happens during the blooming season when tubular flowers in shades of pink, red, white, orange, or purple emerge from the stem tips.
With proper care, these plants become family heirlooms, living for decades and producing increasingly spectacular flower displays each year. Some specimens have thrived for over a century, passing from generation to generation.
How to Care for a Christmas Cactus: 5 Essential Steps
Getting your Christmas cactus care routine right involves having the proper setup from the start. Here’s what you’ll need before diving into the steps.
Tools and Materials
Item
Purpose
Pot with drainage holes
Prevents water from pooling and causing root rot
Well-draining cactus or succulent soil mix
Provides proper aeration and moisture balance
Watering can with narrow spout
Allows precise watering at the soil level
Balanced liquid fertilizer
Supplies essential nutrients during the growing season
Spray bottle for misting
Increases humidity around the plant
Step 1: Provide the Right Light and Location
Place your Christmas cactus near an east or west-facing window where it receives bright, indirect sunlight.
Avoid direct afternoon sun, which can scorch the stems, causing them to turn reddish or appear bleached. The stem segments should maintain a healthy green color as your indicator of proper lighting conditions.
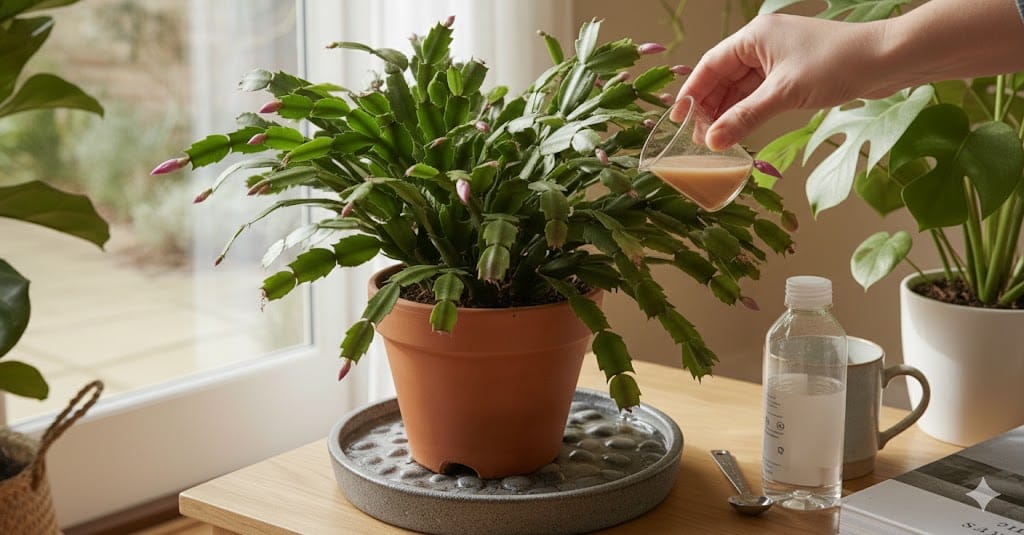
Step 2: Water Properly and Use Well-Draining Soil
Check the soil about an inch below the surface and water when it feels dry at that depth.
Use a well-draining potting mix designed explicitly for cacti or succulents, or create your own blend with regular potting soil, perlite, and orchid bark.
Always ensure excess water can escape through drainage holes.
Step 3: Maintain Ideal Temperature and Humidity
Keep your Christmas cactus in temperatures between sixty and seventy degrees Fahrenheit for optimal growth.
These tropical plants appreciate humidity levels around fifty percent, so consider misting occasionally, placing a pebble tray with water beneath the pot, or grouping them with other plants to create a microclimate.
Step 4: Fertilize During Growing Season
Feed your Christmas cactus monthly from spring through early fall using a balanced, water-soluble fertilizer diluted to half strength.
Stop fertilizing in late fall and winter when the plant enters its rest period before blooming. This break helps encourage bud formation for the upcoming flower display.
Step 5: Trigger Blooming with Darkness and Cool Temperatures
Starting in late September or early October, give your plant fourteen hours of complete darkness each night and reduce watering slightly. Maintain cooler temperatures around fifty-five degrees if possible.
Continue this routine for six to eight weeks until buds form, then resume regular care and watch the magic unfold.
Now that you’ve mastered the essential care steps, let’s address some pitfalls that could derail your Christmas cactus success.
Common Christmas Cactus Care Mistakes to Avoid
Even experienced plant parents sometimes stumble when caring for Christmas cacti. Recognizing these common errors helps you avoid frustration and keeps your plant thriving year after year.
Mistake
Why It’s Problematic
How to Fix It
Treating it like a desert cactus
These tropical plants need consistent moisture and will quickly shrivel if left too dry.
Water when the top inch of soil feels dry, not bone dry.
Overwatering and poor drainage
Roots rot quickly in soggy soil, leading to mushy, collapsing stems.
Always check soil moisture before watering and ensure drainage holes exist.
Direct sunlight exposure
Harsh rays cause stress, reddish discoloration, and bleached-looking segments.
Move to a bright, indirect light location away from intense afternoon sun.
Skipping the fall darkness period
Without environmental triggers, the plant won’t form flower buds.
Provide fourteen hours of darkness nightly for six to eight weeks in the fall.
Moving the plant frequently
Sudden ecological changes cause bud drop and stress.
Keep in a consistent location, especially once buds form.
Understanding these mistakes gives you a clear roadmap of what not to do. But there’s more you can explore to get even more from your Christmas cactus.
Bonus Tips for Your Christmas Cactus
Ready to expand your Christmas cactus collection or share this beauty with loved ones? Here are some advanced techniques that take your plant care to the next level.
Propagation made simple: After blooming ends in late winter or early spring, twist off a segment containing two or three connected sections. Let the cut end dry for a few hours to callus over, then insert it about an inch deep into moist potting soil. Roots develop within weeks, giving you a brand new plant.
Water propagation option: Place segments in a small glass with just the bottom portion submerged, changing water every few days. Once roots reach about an inch long, transplant into soil.
Repotting wisdom: Christmas cacti actually prefer being slightly root-bound and bloom better in cozy conditions. Only repot every two or three years when roots grow out of drainage holes. Choose a pot just one size larger since excessive soil retains too much moisture.
Timing matters: The best repotting window is right after blooming ends in late winter or early spring. Gently remove the plant, shake off old soil, inspect roots for damage, and trim any brown, mushy sections before settling into a fresh mix.
Post-repotting care: Wait about a week before watering to allow disturbed roots to heal and prevent rot. Then resume your routine and enjoy watching your refreshed plant flourish.
These bonus techniques transform you from a Christmas cactus caretaker into a true enthusiast who can multiply your collection endlessly.
Conclusion
Caring for a Christmas cactus truly boils down to understanding its tropical nature and providing consistent, thoughtful attention throughout the year.
Remember those five essential steps: proper lighting placement, balanced watering with excellent drainage, comfortable temperature and humidity levels, appropriate fertilization during growing months, and that crucial fall darkness period to trigger spectacular blooms.
Your reward will be a stunning display of flowers that brightens the darkest time of year and becomes more magnificent with each passing season.
Ready to become a Christmas cactus expert?
Start implementing these techniques today, and share your blooming success stories with fellow plant enthusiasts.
Your future self will thank you when holiday visitors marvel at your thriving, flower-laden plant.
There’s something magical about standing at the edge of something entirely new.
Maybe you’ve closed a chapter that no longer served you, or perhaps life has nudged you toward an unexpected turn.
Whatever brought you here, you’re not alone in seeking words that understand the beautiful complexity of starting over.
Fresh starts aren’t always easy. They come with uncertainty, excitement, fear, and hope all tangled together.
But they also bring possibility, growth, and the chance to write a story that feels yours authentically. These new beginnings quotes aren’t just words on a screen.
They’re whispers of encouragement from people who’ve stood exactly where you are now and found the courage to take that first step forward.
Inspirational New Beginnings Quotes for Your Journey
The following new beginnings quotes explore what it really means to start again with intention, self-trust, and an open heart.
Quotes for Embracing the Journey
Every sunrise reminds us that we can start again with nothing but hope and courage.
The distance between who you are and who you’ll become is measured in brave decisions.
You don’t need permission to begin something beautiful today.
Tomorrow arrives with a clean slate, untouched by yesterday’s mistakes.
Starting over isn’t about erasing what was. It’s about honoring what can be.
Your next chapter begins the moment you decide you’re ready for more.
The bravest thing you can do is choose yourself when the world expects you to settle.
Change whispers before it roars. Listen to those quiet nudges toward transformation.
Each ending carries within it the seed of something greater waiting to bloom.
You’ve survived every difficult moment up until now. This new beginning is no different.
The path forward may be unclear, but movement creates its own clarity.
Sometimes growth looks like leaving behind what you thought you needed.
Your story doesn’t end here. It simply turns to a page you’ve never read before.
Beginnings don’t require perfection. They only ask for willingness.
The version of you that exists tomorrow doesn’t have to carry what weighs you down today.
Life rewards those brave enough to step into uncertainty with an open heart.
Your journey is uniquely yours, and comparison will only cloud your vision.
The most incredible adventure often starts when you stop waiting for the perfect moment.
You’re not starting from scratch. You’re starting with experience, wisdom, and resilience.
Every moment holds the potential to shift your entire trajectory if you let it.
The universe conspires in your favor the moment you commit to your own growth.
Fresh starts don’t always announce themselves. Sometimes you decide it’s time.
Your courage to begin again will inspire others to do the same.
The discomfort of change is temporary, but regret lasts much longer.
Trust that your next chapter will reveal what your current one cannot.
Quotes About Letting Go and Moving Forward
Holding onto the past prevents you from embracing what’s ahead.
Some doors close because what’s behind them isn’t meant for your journey.
Letting go creates space for something more aligned with who you’re becoming.
You cannot discover new lands while keeping one foot on the familiar shore.
The weight of yesterday doesn’t belong in your tomorrow.
Freedom comes when you finally release what you’ve been desperately clutching.
Not every person from your past belongs in your future, and that’s okay.
Forgiveness isn’t about them. It’s about freeing yourself to move forward.
Sometimes the best thing you can do is permit yourself to walk away.
Who you were yesterday taught you everything you needed to know for today.
Closure isn’t always found. Sometimes you create it by choosing to move on.
The person you were did their best with what they knew. Now you know more.
Releasing old patterns makes room for new possibilities to find you.
You can honor your history while refusing to be trapped by it.
What you leave behind often matters less than what you’re walking toward.
Endings are complex, but they’re also necessary for transformation.
The life you’re clinging to might be blocking the one you’re meant to live.
Growth requires shedding old skin, even when it feels uncomfortable.
You’re allowed to outgrow people, places, and versions of yourself.
Letting go isn’t giving up. It’s making space for something better.
Your healing journey begins when you stop trying to fix what’s already over.
The past is a teacher, not a prison. Learn from it and keep moving.
Some chapters must end abruptly for the next to begin correctly.
You’re not abandoning who you were. You’re becoming who you’re meant to be.
Release the need to understand everything before you take your next step.
Quotes for Starting a New Chapter
The life you want begins with small, consistent choices made today.
Your future self will thank you for the brave decision you’re making right now.
Dreams don’t manifest by waiting. They require action, even imperfect action.
Today is precisely the right time to begin building what you’ve been imagining.
You’re the author of your story, and the pen is in your hand.
New opportunities often appear the moment you stop looking backward.
The goals that scare you are usually the ones worth pursuing.
Your potential lives in the choices you make today, not the mistakes you made yesterday.
Small steps taken consistently will lead you further than you imagined possible.
The person you admire started exactly where you are now.
Your circumstances may shape the beginning, but your choices determine the ending.
Progress isn’t always visible, but every effort moves you closer to transformation.
The life you desire requires you to become someone you’ve never been before.
Change becomes easier when you focus on who you’re becoming rather than what you’re losing.
Your breakthrough is often hiding just beyond your comfort zone.
What feels impossible today will become your testimony tomorrow.
The distance between your dreams and reality shrinks with each intentional action.
You’re building something beautiful, even when you can’t see the whole picture yet.
New beginnings don’t guarantee ease, but they promise possibility.
Your transformation isn’t about becoming someone else. It’s about becoming more yourself.
The obstacles in your path are simply opportunities to prove your commitment.
Every expert was once a beginner who refused to give up.
Your new chapter will unfold in its own time. Trust the process.
The journey ahead may challenge you, but it will also reveal strengths you didn’t know you had.
Right now, in this very moment, you have everything you need to take the first step.
Moving Forward with Intention
Fresh starts aren’t reserved for New Year’s Day or significant life events. They’re available to you whenever you’re ready to claim them.
The best new beginnings quotes don’t promise that change will be easy. They remind us that growth is always worth the effort.
As you step into whatever comes next, remember that doubt and courage can coexist, that progress isn’t always linear, and that your willingness to try again is already proof of your strength.
So take a deep breath, bookmark the messages that resonated most, and permit yourself to begin. Your next chapter is waiting, and it starts the moment you decide you’re worth the effort.
The smell of pine fills the air. Twinkling lights brighten cold winter nights. And somewhere, a bell rings softly.
Christmas brings more than gifts and decorations. It brings a chance to connect with the people we care about most. A few heartfelt words can make someone’s day brighter.
They can remind a friend they’re valued. They can bring comfort to a family member far away. And they can spread the kind of warmth that stays long after the season ends.
Finding the right words isn’t always easy. You want something meaningful but not over the top. Something personal but not forced. That’s where a little inspiration helps.
This collection of inspirational Christmas messages is designed to help you share warmth, encouragement, and genuine connection with everyone in your life.
From family to friends, from coworkers to neighbors, you’ll find words that feel genuine and kind. Use them as they are or adjust them to fit your style.
Why Christmas Messages Matter?
Christmas messages do more than fill a card. They create moments of connection. These inspirational Christmas messages are more than seasonal words. They’re reminders of care, presence, and kindness.
When you send a thoughtful message, you’re telling someone they matter. You’re taking time out of your busy season to reach out. That effort alone means something.
Messages also bridge distance. Not everyone can be together during the holidays. A warm note can make someone feel closer even when they’re miles away.
And they last. People save cards and reread messages. Your words might bring comfort on a tough day, long after Christmas has passed.
Heartfelt Christmas Messages for Family and Loved Ones
Family forms the foundation of our holiday celebrations. These messages help you express gratitude, love, and appreciation to the people who shaped your life. Use them to strengthen bonds and create lasting memories this Christmas season.
Messages for Parents
Parents deserve recognition for the love and sacrifice they give year-round. These messages thank them for creating magical Christmases and building a home filled with warmth.
Thank you for making every Christmas feel like home.
Everything I know about giving came from you.
I hope this season brings you as much joy as you’ve given me.
Christmas feels magical because you made it that way.
Wishing you peace and happiness this holiday season.
You’ve taught me the true meaning of family.
May your Christmas be filled with laughter and light.
I’m grateful for every memory we’ve made together.
Your kindness has shaped who I am today.
Sending you all my love this Christmas and always.
Messages for Siblings
Siblings are our first friends and lifelong companions. These messages celebrate the special bond you share and the memories you continue to build together.
You make the holidays brighter just by being you.
Merry Christmas to my partner in holiday chaos.
I’m lucky to have you in my life all year long.
Here’s to more memories and inside jokes.
Christmas wouldn’t be the same without you around.
You bring out the kid in me every holiday season.
Thanks for always having my back.
May this Christmas bring you everything you’ve been hoping for.
You’re more than family. You’re my friend.
Wishing you a season full of happiness and good surprises.
Messages for Spouses and Partners
Your partner makes every day special, and Christmas is the perfect time to remind them. These messages express the deep love and gratitude you feel for the person by your side.
You’re my favorite part of every Christmas morning.
I’m grateful to share another holiday season with you.
You make every day feel like a celebration.
Thank you for being my home.
You’re the best part of my life.
Your love makes everything better.
Here’s to many more Christmases together.
You fill my heart with comfort all year round.
I couldn’t ask for a better person to do life with.
Merry Christmas to the one who completes me.
Messages for Children
Children bring wonder and excitement to Christmas. These messages nurture their innocence while showing them how much they’re loved and cherished.
May your Christmas be filled with wonder and joy.
You make every holiday season more special.
Watching you smile is the best gift I could ask for.
I hope all your Christmas wishes come true.
You bring light and laughter wherever you go.
Christmas is better because you’re in it.
Keep believing in the magic around you.
You make me proud every single day.
May your heart always be full of hope and happiness.
I love you more than all the presents under the tree.
Messages for Grandparents
Grandparents hold family traditions and memories close to their hearts. These messages honor their wisdom, love, and the special role they play in your life.
Your stories and traditions make Christmas unforgettable.
Thank you for filling my childhood with love and joy.
You’ve given me the greatest gift: your time and wisdom.
Wishing you a peaceful and joyful Christmas.
I treasure every moment we spend together.
Your love has been a constant blessing in my life.
May this season bring you as much happiness as you’ve given me.
I hope your Christmas is as warm as your heart.
You’re the heart of our family.
Sending you love and gratitude this holiday season.
Thoughtful Christmas Messages for Friends
Friends are the family we choose for ourselves. Whether you’re writing to family, friends, or coworkers, inspirational Christmas messages help turn simple greetings into meaningful moments.
These messages celebrate the friendships that make life more prosperous and more fulfilling, whether your friends are near or far.
Messages for Close Friends
Your closest friends deserve messages that reflect the depth of your bond. These words acknowledge the comfort, joy, and support they bring to your life.
You’ve made this year so much better just by being in it.
Merry Christmas to someone who feels like family.
I’m thankful for every laugh and memory we’ve shared.
May your holidays be as fantastic as you are.
You’ve brought so much meaning to my life.
Here’s to friendship that makes life brighter.
I hope your Christmas is filled with love and good times.
Thanks for always showing up when it matters.
You make the hard days easier and the good days better.
Wishing you all the joy you bring to others.
Messages for Long-Distance Friends
Distance can’t weaken true friendship. These messages bridge the miles and remind your faraway friends that they’re always in your thoughts and heart.
Distance can’t dim the warmth of our friendship.
I’m sending you Christmas cheer from across the miles.
Even though we’re apart, I carry you in my heart.
I miss you and hope we can celebrate together soon.
May this season remind you how much you’re loved.
Thinking of you and wishing you a beautiful Christmas.
Knowing you’re in my life makes every season brighter.
I can’t wait until we’re together again.
Sending hugs and holiday wishes your way.
You’re always with me, no matter the miles between us.
Messages for New Friends
New friendships bring fresh energy and excitement. These messages welcome recent additions to your life while expressing appreciation for the connection you’re building.
I’m glad we met this year.
Here’s to the start of a great friendship.
You’ve already made my life better in so many ways.
Wishing you a Christmas filled with happiness.
I hope this is the first of many holidays we share.
Thanks for making this year more fun.
I’m looking forward to more memories together.
May your season be bright and full of good things.
You’re a welcome addition to my life.
Merry Christmas to a friend who already feels like an old one.
Uplifting Christmas Messages for Coworkers and Colleagues
Professional relationships deserve recognition during the holidays. These messages strike the right balance between warmth and professionalism, showing appreciation for the people you work with daily.
Messages for Team Members
Your colleagues make the workday better. These messages thank them for their collaboration, support, and the positive energy they bring to the workplace.
Thanks for making work feel less like work.
Your support has meant more than you know.
Wishing you a well-deserved break and a joyful Christmas.
It’s been great working alongside you this year.
May your holidays be filled with rest.
You bring positivity to the office every day.
Your contributions have helped us reach our goals this year.
Here’s to another year of success together.
You make the workplace a better place to be.
Merry Christmas and thanks for being such a dependable teammate.
Messages for Managers and Leaders
Leaders who guide and support their teams deserve special recognition. These messages express gratitude for their mentorship, guidance, and the positive impact they’ve made.
Thank you for your guidance and encouragement this year.
Your leadership has made a real difference.
Wishing you a Christmas full of peace and happiness.
I’m grateful to work with someone who truly cares.
Your support has helped me grow in so many ways.
May this season bring you the rest you’ve earned.
Thanks for believing in the team and me.
I hope your holidays are as rewarding as the work you do.
The way you lead with integrity inspires us all.
Merry Christmas to a leader who brings out the best in others.
Messages for Business Clients
Clients and business partners contribute to your success. These professional yet warm messages maintain relationships while expressing genuine appreciation for their trust and collaboration.
Thank you for your trust and partnership this year.
Wishing you success and joy this holiday season.
It’s been a pleasure working with you.
May your Christmas be filled with good things.
Here’s to another year of collaboration and growth.
Your support has been invaluable to us.
We appreciate the opportunity to serve you.
Wishing you and your team a wonderful holiday.
Thank you for being part of our success.
May the new year bring continued prosperity.
Encouraging Christmas Messages for Those Facing Challenges
Not everyone finds the holidays easy. These compassionate messages offer comfort, hope, and support to those going through difficult times, reminding them they’re not alone.
Messages for Someone Grieving
Loss feels especially heavy during the holidays. These gentle messages acknowledge pain while offering comfort and letting someone know you’re thinking of them.
I’m thinking of you during this challenging season.
You have people who care deeply about you.
May you find moments of peace and comfort.
Sending you love and strength this Christmas.
Your loved one’s memory lives on in your heart.
It’s okay to feel however you need to feel.
I’m here for you, today and always.
Wishing you gentle moments of healing.
You’re surrounded by people who care about you.
May this season bring you minor signs of hope.
Messages for Someone Facing Illness
Health challenges can make the season harder. These messages offer encouragement and remind someone battling illness that they’re supported and cared for.
You’re in my thoughts and prayers this Christmas.
Your strength inspires everyone around you.
Wishing you comfort and better days ahead.
I hope this season brings you moments of joy.
You’re not fighting this battle alone.
May you feel surrounded by love and support.
Sending healing thoughts and warm wishes your way.
You’re stronger than you know.
I’m here for you whenever you need me.
May Christmas bring you peace and rest.
Messages for Someone Going Through Hard Times
Financial stress, job loss, or personal struggles can overshadow the holidays. These messages provide hope and encouragement when someone needs it most.
This season will pass, and brighter days are coming.
You’re tougher than any challenge you’re facing.
I believe in you and your ability to get through this.
Sending you hope and encouragement this Christmas.
You deserve kindness, especially from yourself.
May this holiday season bring you a fresh start.
I’m rooting for you every step of the way.
You’ve overcome so much already.
Things will get better. Hold on to that.
You’re valued and loved more than you realize.
Joyful and Lighthearted Christmas Messages
Sometimes the best gift is a smile. These lighthearted messages bring humor and cheer to your Christmas greetings, perfect for spreading laughter and keeping things fun. These inspirational Christmas messages work perfectly for cards, texts, or handwritten notes.
Messages with Humor
Laughter makes the holidays brighter. These playful messages add a dose of humor to your Christmas wishes, perfect for friends and family who appreciate a good laugh.
May your Christmas be merry and your family drama minimal.
Here’s hoping Santa knows you’ve been mostly good.
Wishing you more cookies and less stress this season.
Let’s eat, drink, and pretend calories don’t count.
May your tree stay up and your spirits remain high.
Christmas is the season of giving and regifting.
I hope your holiday sweater is as bright as your mood.
Cheers to another year of surviving family gatherings.
May your Christmas be filled with laughter and leftovers.
Here’s to making it through another year without burning the turkey.
Short and Sweet Messages
Sometimes less is more. These brief messages pack warmth and sincerity into just a few words, perfect for cards, texts, or quick notes.
Wishing you joy this Christmas.
May your season be bright.
Merry Christmas and much love.
Sending warm wishes your way.
Hope your holidays are fantastic.
Peace and happiness to you.
May your heart be whole this season.
Wishing you all the best.
Have a beautiful Christmas.
Thinking of you with love.
Messages for Neighbors
Good neighbors make a community feel like home. These friendly messages show appreciation for the people who live nearby and help create a sense of belonging.
Thanks for being a great neighbor.
Wishing you a cozy and happy Christmas.
May your home be filled with warmth and cheer.
It’s nice to have good people like you nearby.
Hope your holidays are as kind as you are.
Merry Christmas to the best neighbor around.
Thanks for always lending a helping hand.
Wishing you peace and joy this season.
May your Christmas be filled with good times.
Here’s to another year of being great neighbors.
Wrapping Up
Christmas comes once a year, but the impact of a kind message can last much longer. Taking a moment to share your thoughts shows people they’re not forgotten. It tells them they matter.
You don’t need to write something perfect. You need to write something real. The best inspirational Christmas messages aren’t about perfection.
They’re about sincerity, care, and showing up for people who matter. A simple note can brighten someone’s day. It can remind them they’re loved. And it can spread a little more light in a world that needs it.
So pick a message, add your personal touch, and send it out. The people in your life will appreciate the effort. And you’ll feel good knowing you made someone smile.
That’s what the season is really about: connection, kindness, and care. Go ahead and share that with someone today.
Ever watched a kid’s face light up when they squish something squishy between their fingers?
That pure joy is exactly what pudding play-dough brings to the table. This isn’t your regular craft store clay. It’s something way more fun.
Pudding play-dough combines two things kids love: getting messy and sweet treats. The best part? Parents love it too because it’s completely safe if little ones decide to taste.
This colorful, stretchy creation feels incredible in tiny hands. It smells like dessert and provides hours of entertainment. Plus, making it together becomes a memory worth keeping.
If it’s a rainy afternoon activity or a birthday party hit, pudding, play-dough never disappoints. It’s simple to make with ingredients most families already have at home.
Ready to create some edible fun?
What is Pudding Play-Dough
Pudding playdough is an edible, sensory play material made by combining instant pudding mix with powdered milk or flour to create a moldable, dough-like texture.
This safe alternative to traditional playdough allows young children to find tactile experiences without safety concerns if accidentally ingested.
The mixture typically uses vanilla or chocolate pudding powder mixed with enough dry ingredients to achieve a pliable consistency that can be shaped, rolled, and molded like regular playdough.
Popular among parents and educators, playdough provides hands-on learning opportunities that engage multiple senses. It’s particularly beneficial for toddlers who tend to put objects in their mouths during play, providing caregivers with peace of mind.
Ingredients Needed for Pudding Playdough
Making pudding play-dough requires just a few simple ingredients from your kitchen pantry.
These basic items come together to create something magical that kids love. No fancy supplies or special orders needed. Everything is probably sitting in your cupboard right now.
1. Instant Pudding Mix (1 box)
2. Cornstarch (1 cup)
3. Vegetable Oil (2 tablespoons)
4. Food Coloring (optional)
Step-by-Step Recipe for Pudding Playdough
Making pudding play-dough is easier than baking cookies. Follow these simple steps and you’ll have perfect, squishy fun in just minutes. Take your time with each step to get the best results.
Kids can help with almost every part of this process.
1. Mix the Dry Ingredients First
Pour the instant pudding mix and cornstarch into your large mixing bowl. Use a whisk or spoon to blend them thoroughly before adding any wet ingredients.
This prevents lumps from forming later in the process. Make sure there are no clumps of cornstarch hiding in the mixture.
2. Add Oil Slowly While Stirring
Drizzle the vegetable oil into the dry mixture a little at a time. Stir constantly as you pour to help everything combine evenly.
Adding oil too quickly can make the mixture clumpy or uneven. Keep stirring until the texture starts looking like wet sand or cookie crumbs.
3. Knead the Mixture
Once the ingredients start clumping together, it’s time to use your hands. Press and fold the mixture until it forms a smooth ball of dough.
This step takes a few minutes of patient kneading. The warmth from your hands helps everything blend perfectly.
4. Add Food Coloring if Desired
Drop a few drops of food coloring onto the finished dough. Knead it in thoroughly until the color spreads evenly throughout.
Start with less color than you think you need since it’s easier to add more. Wash your hands between different colors to keep them from mixing.
Safety Tips for Pudding Play-Dough
Even though pudding play-dough is safe to eat, following a few simple guidelines keeps everyone happy and healthy. These tips help prevent messes and ensure the best playtime experience.
Smart preparation makes the whole activity more enjoyable for kids and parents alike.
Safety Tip
Why It Matters
What To Do
Wash your hands before and after
Keeps germs away from edible play-dough
Use soap and warm water for 20 seconds
Supervise young children
Prevents overeating and choking
Stay nearby during playtime
Store in the refrigerator
Keeps play-dough fresh and safe
Use an airtight container, lasts 3-5 days
Check for allergies
Avoids reactions to pudding ingredients
Read labels before starting
Clean surfaces after use
Prevents sticky residue buildup
Wipe down tables and counters
Following these safety guidelines ensures everyone has fun without any worries. Remember that even safe ingredients work best when used responsibly and with adult guidance nearby.
Fun Variations to Try with Pudding Playdough
The basic pudding play-dough recipe opens up a world of creative possibilities for never-ending fun. Simple additions and flavor swaps can change ordinary play-dough into extraordinary sensory experiences.
These exciting variations keep kids engaged and help spark their imagination in new ways. Each twist brings something special to playtime while maintaining the same safe, edible qualities parents love.
1. Sparkly Glitter Play-Dough
Add a pinch of edible glitter or cake decorating sparkles to make the play dough shimmer and shine. The tiny sparkles catch the light beautifully and make everything feel more magical during play.
Kids love watching their creations twinkle as they mold and shape their glittery masterpieces.
2. Cookie Stamp Ideas
Use cookie cutters, toy stamps, or even clean household items to create fun patterns and shapes in the play dough. Press alphabet stamps, animal shapes, or geometric patterns into the soft surface to make lasting impressions.
This stamping activity helps develop fine motor skills while letting kids create personalized designs and practice letters or numbers.
3. Rainbow Creation
Make separate batches with different food coloring, then twist them together for marbled rainbow effects. The swirling colors create beautiful patterns that change as kids work and play with the dough.
This technique teaches color mixing while creating stunning visual effects that fascinate little artists.
4. Chocolate Chip Cookie Dough
Use chocolate pudding mix and add mini chocolate chips for a realistic cookie dough experience. The chips add interesting texture and make the play-dough feel more like real baking ingredients.
Kids can pretend to make cookies while enjoying the chocolatey smell and bumpy texture.
5. Glow-in-the-Dark Mystery Dough
Add a small amount of glow-in-the-dark powder (food-safe) to create play dough that lights up in the dark. Charge the dough under bright light, then turn off the lights to watch magical glowing creations appear.
This variation adds an element of science and wonder that makes bedtime play extra special and exciting.
Why Pudding Play-Dough is Perfect for Kids
Safety comes first with pudding play-dough. Unlike regular modeling clay, this treat won’t harm curious toddlers who love putting everything in their mouths. It’s made from simple kitchen ingredients that parents trust.
The sensory experience is incredible. Kids love the smooth, stretchy texture that feels completely different from regular play-dough.
The sweet vanilla or chocolate scent makes playtime even more enjoyable. Bright colors catch their attention and spark creativity.
Making it is surprisingly simple. Most families already have the basic ingredients at home. No special trips to craft stores needed. Kids can help mix and measure, turning the whole process into a fun learning experience.
This edible alternative gives parents peace of mind while children experiment with their imagination. It’s mess-friendly fun that everyone can enjoy together.
Conclusion
Pudding play-dough is a creative, safe, and fun activity. This simple recipe changes ordinary kitchen ingredients into hours of entertainment that kids love.
The best part is knowing that curious little taste-testers are completely safe while they experiment and create.
It’s perfect for rainy days, birthday parties, or any time you want to spark imagination. The memories made while squishing, rolling, and molding this sweet creation will last much longer than the play-dough itself.
Ready to get started? Gather your ingredients and dive into this delightfully messy fun. Don’t forget to share your experience in the comments below.
What fun variations did you add to your pudding play dough? We’d love to hear about your creative twists and see how much fun your family had!
Crafting with children opens doors to imagination, learning, and precious bonding moments that families treasure for years.
In our fast-paced digital world, hands-on creative activities provide children with essential opportunities to slow down, focus, and express themselves through art.
From preschoolers learning to hold scissors safely to older children mastering complex design techniques, paper plate crafts grow with your child’s abilities.
Children practice following step-by-step instructions, make color choices, develop spatial awareness, and experience the satisfaction of completing projects independently.
The process encourages problem-solving, patience, and creativity while building self-esteem through artistic accomplishment.
Why Paper Plate Crafts Are Perfect for Children
Paper plate crafts offer the ideal combination of affordability, creativity, and learning for children of all ages.
These engaging yet straightforward projects turn everyday household items into exciting art activities while developing essential skills.
With just basic supplies and imagination, kids can create countless memorable masterpieces.
Affordable and Accessible Materials – Budget-friendly crafting solution that’s inexpensive and readily available, making them perfect for classroom activities or spontaneous creative sessions.
Educational Benefits – Skills development through play, where engaging crafts help children master fine motor skills, artistic expression, and hand-eye coordination.
Versatile Creative Medium – Paper plates transform into virtually anything imaginable, from adorable animals to festive seasonal decorations.
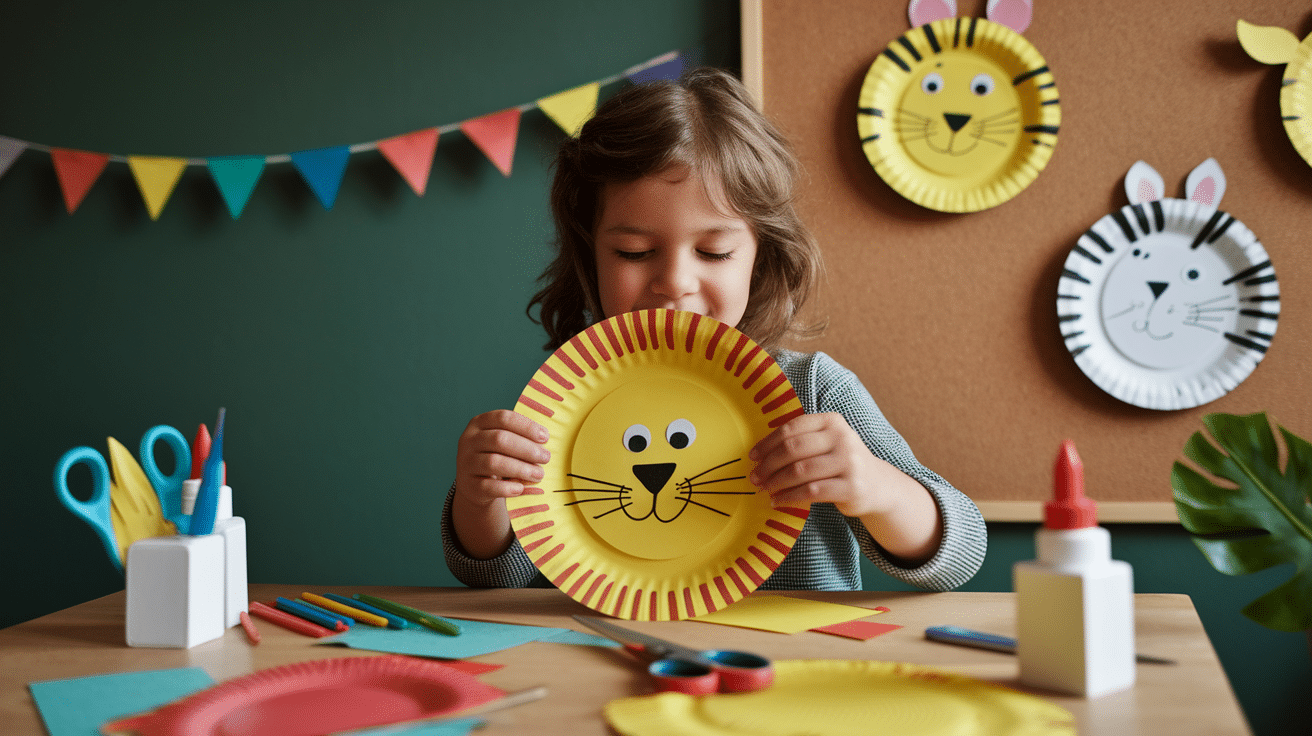
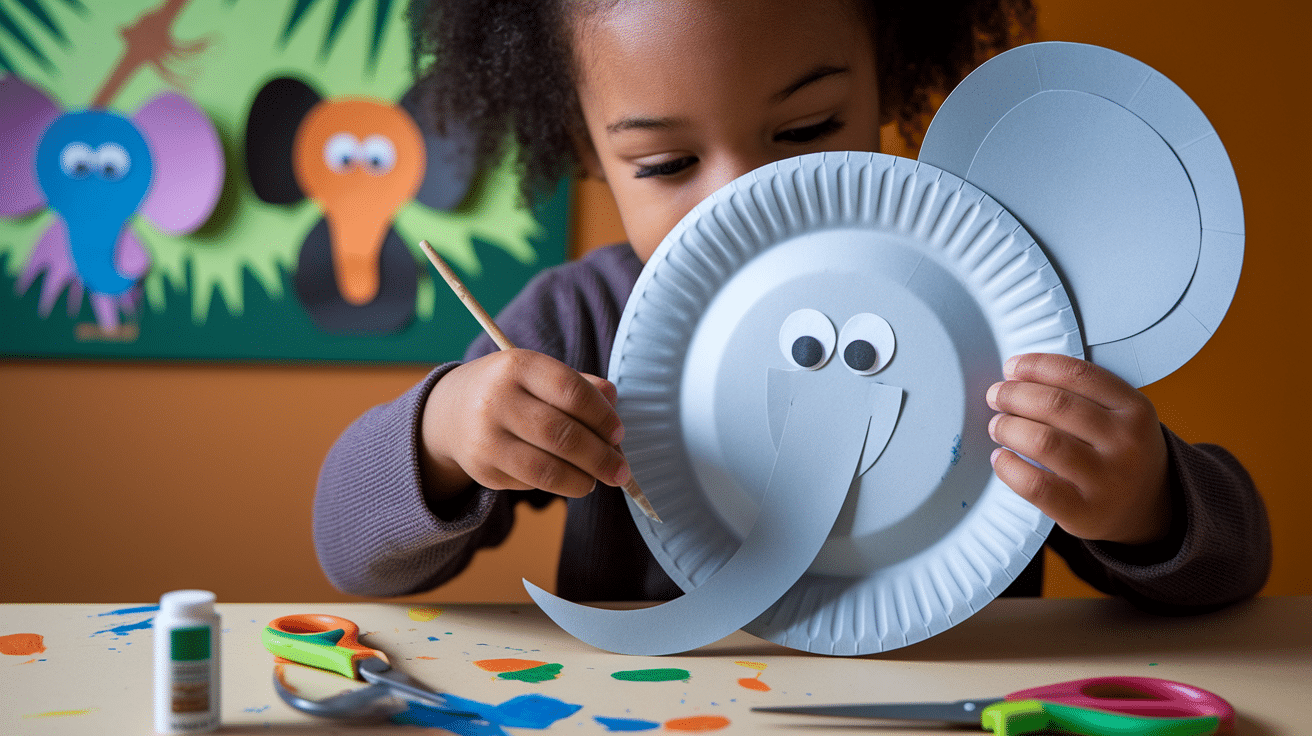
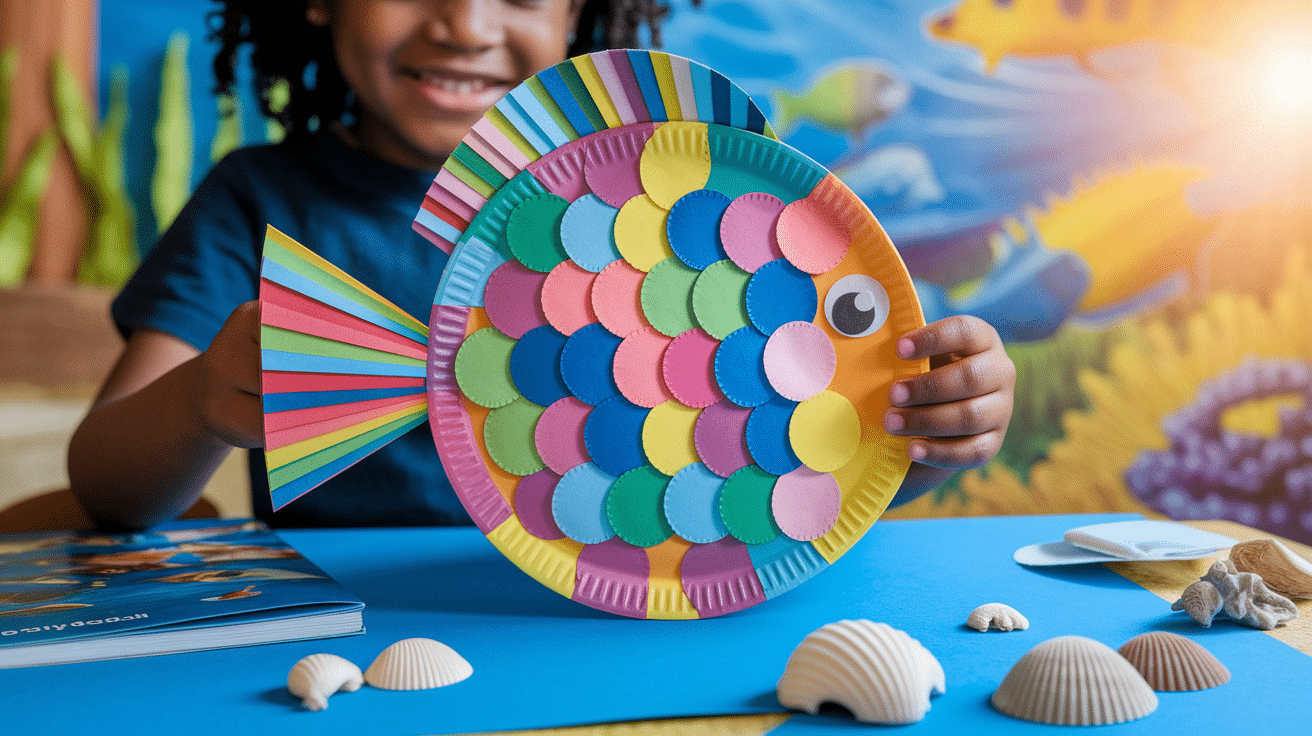
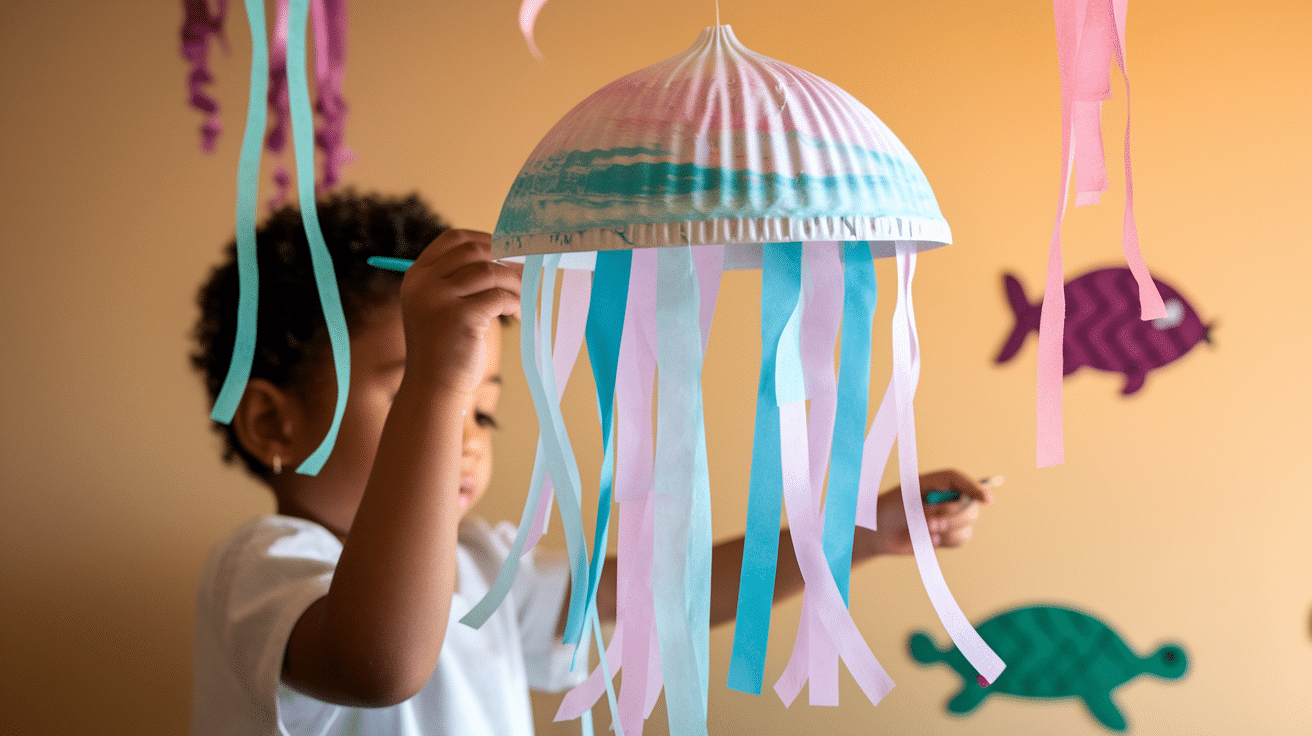
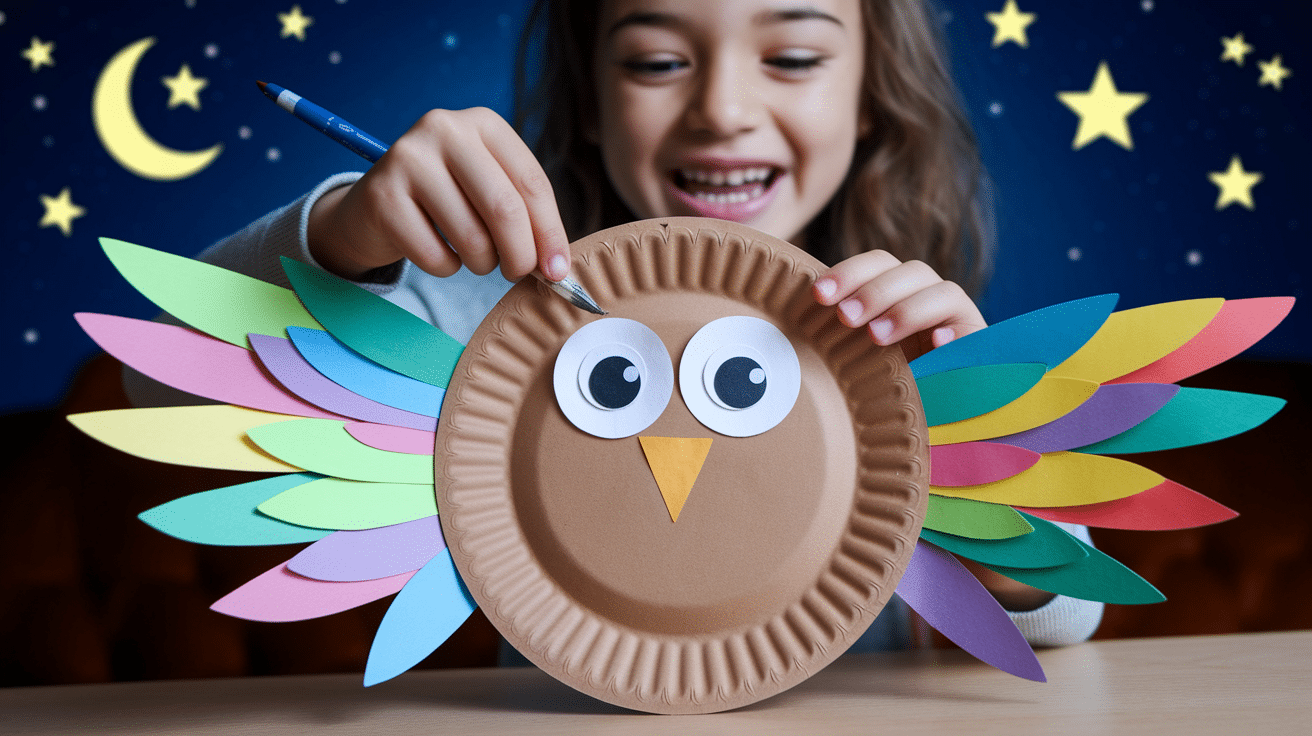
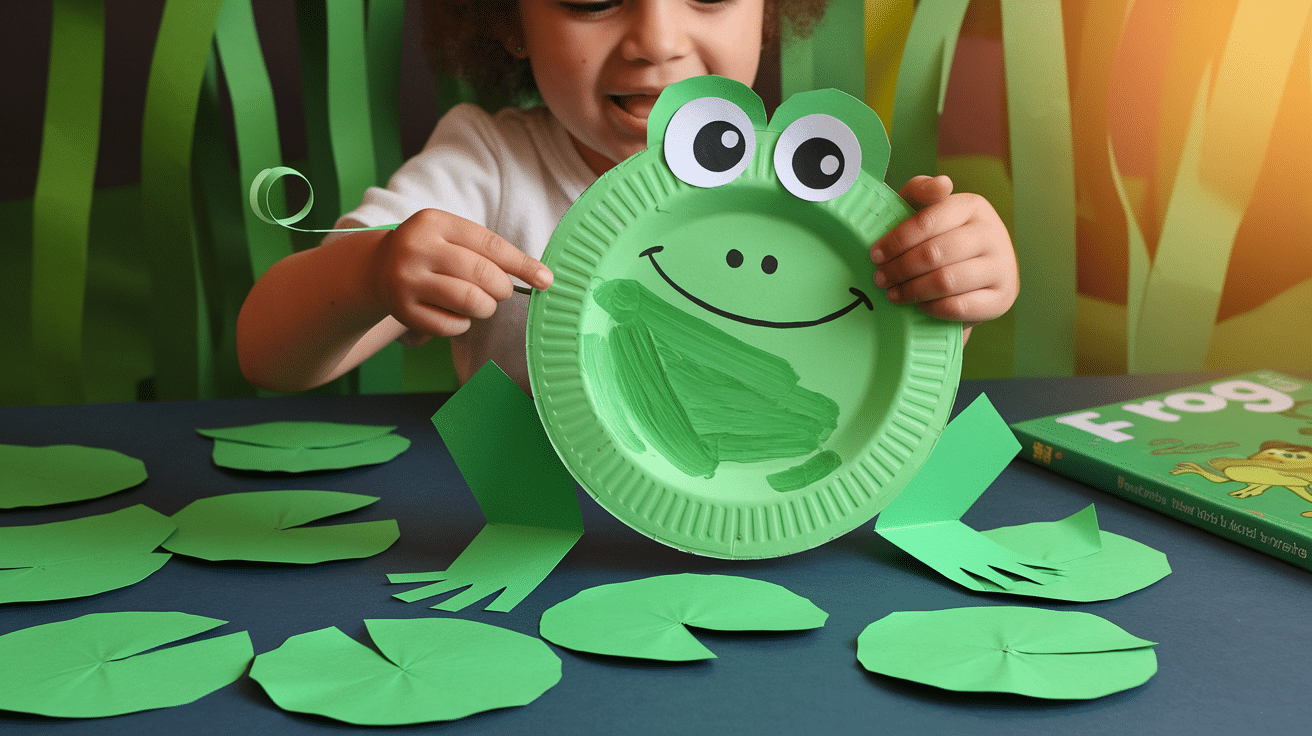
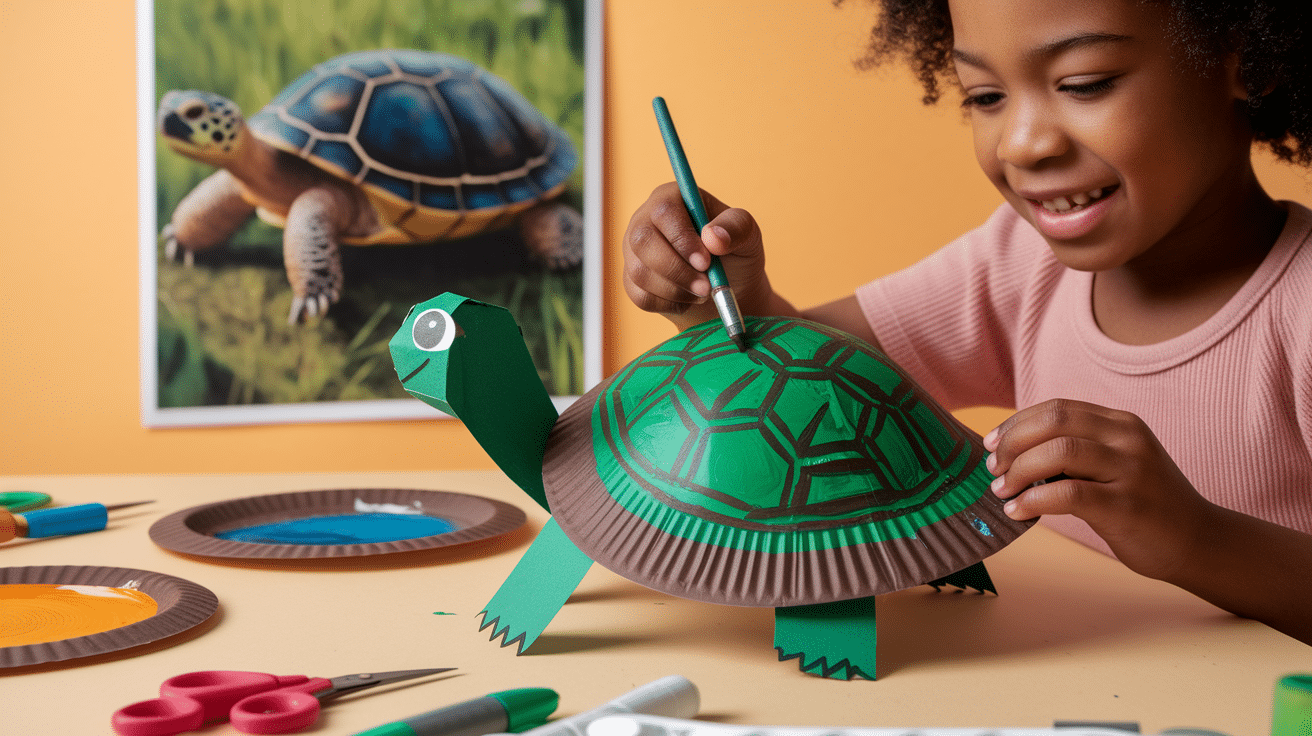
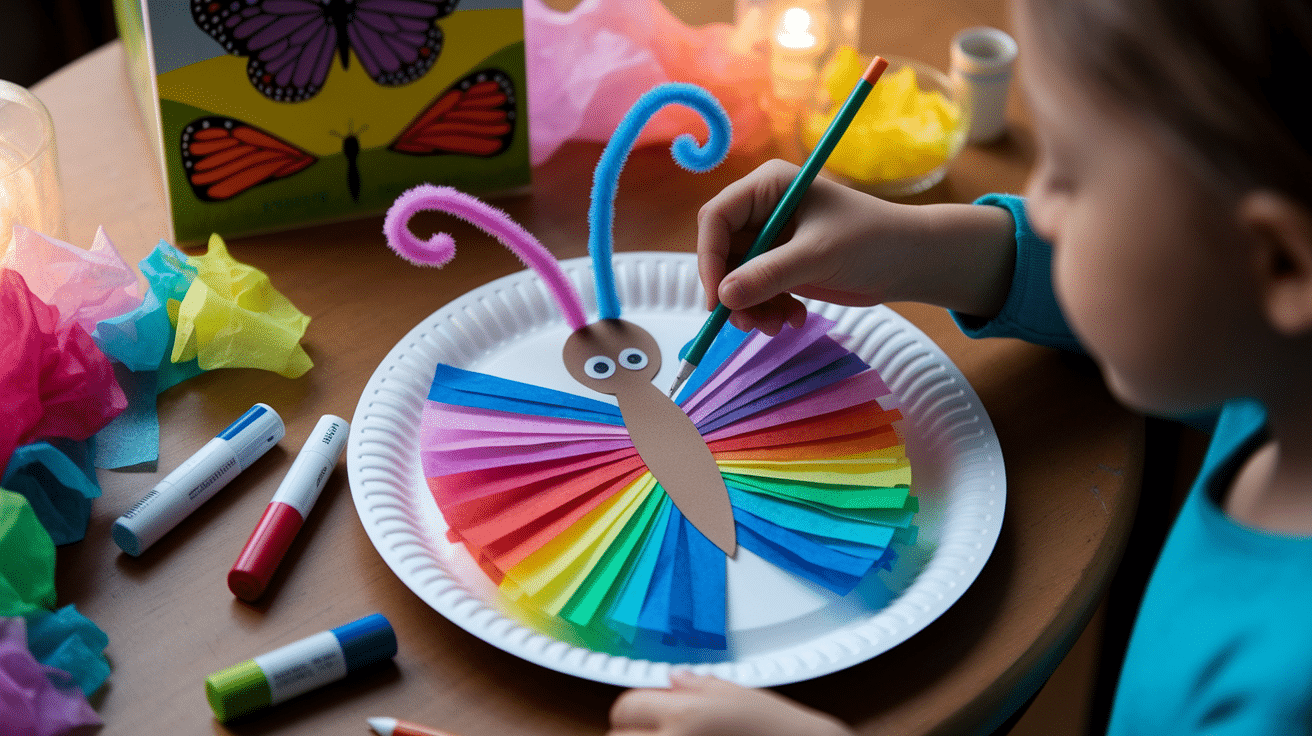
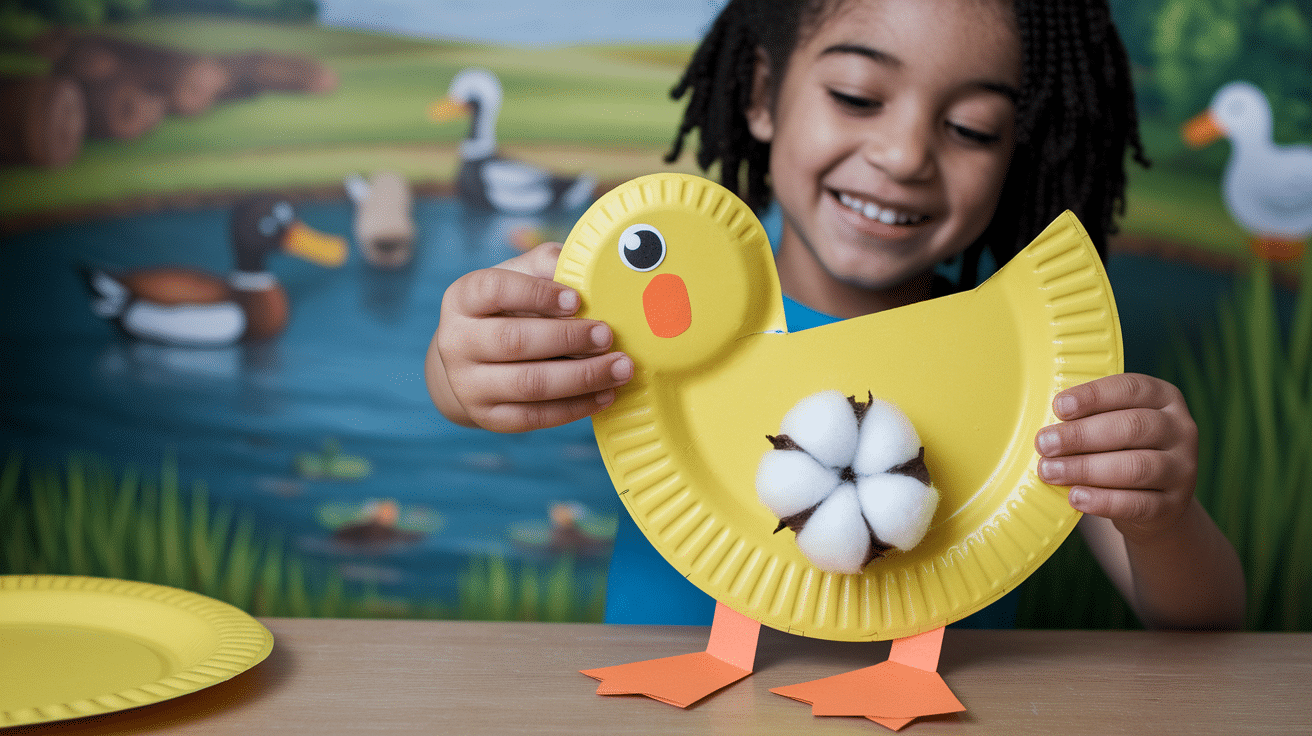
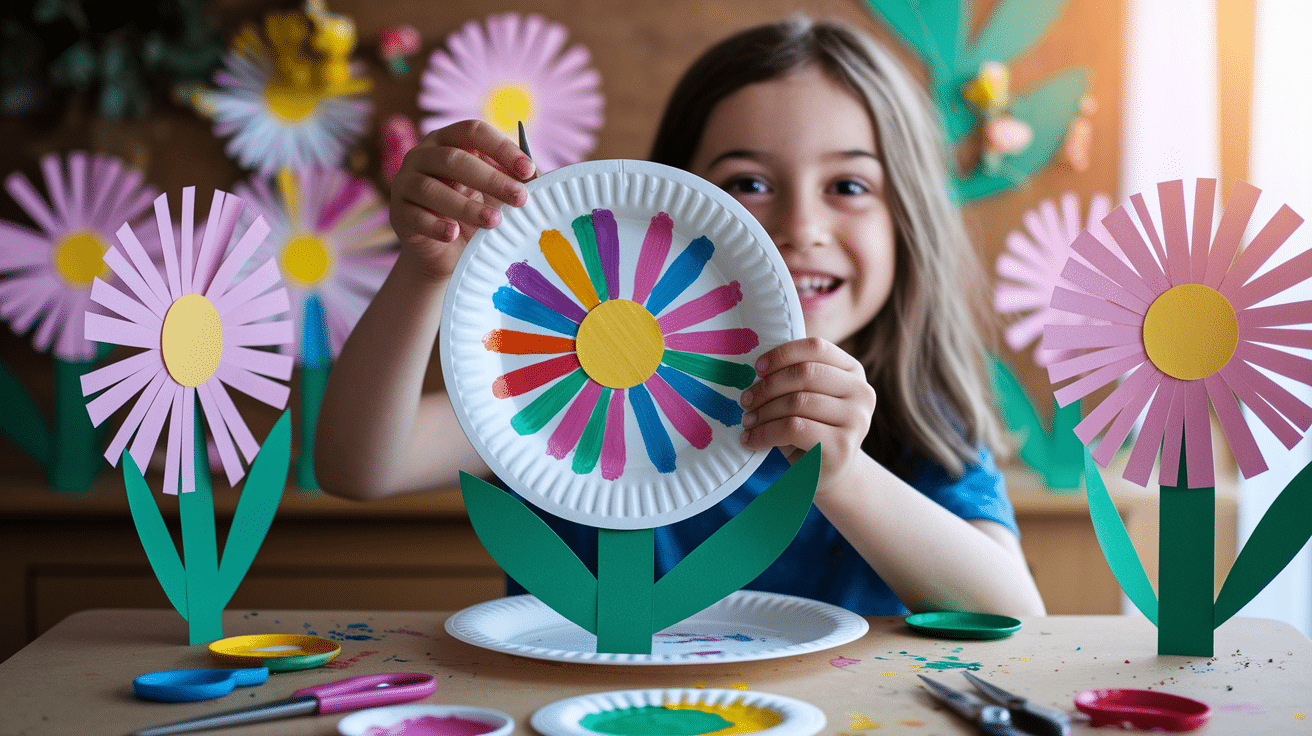
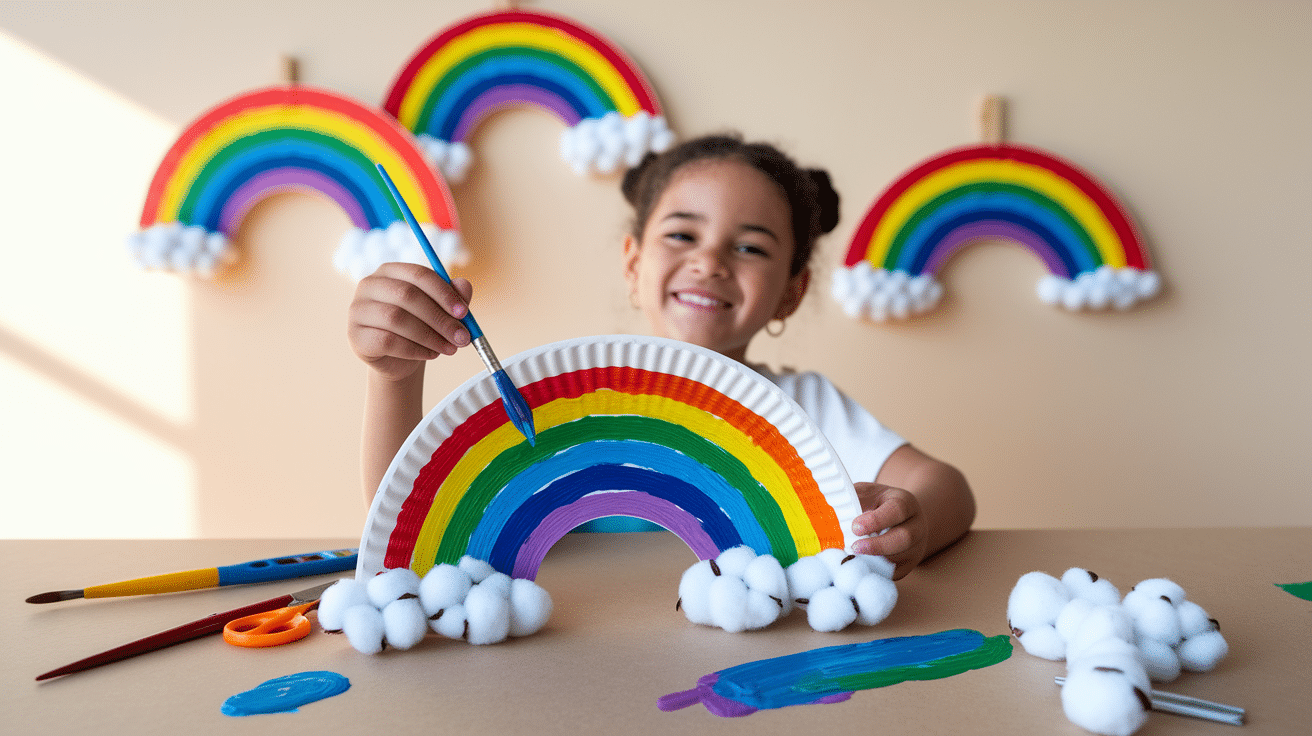
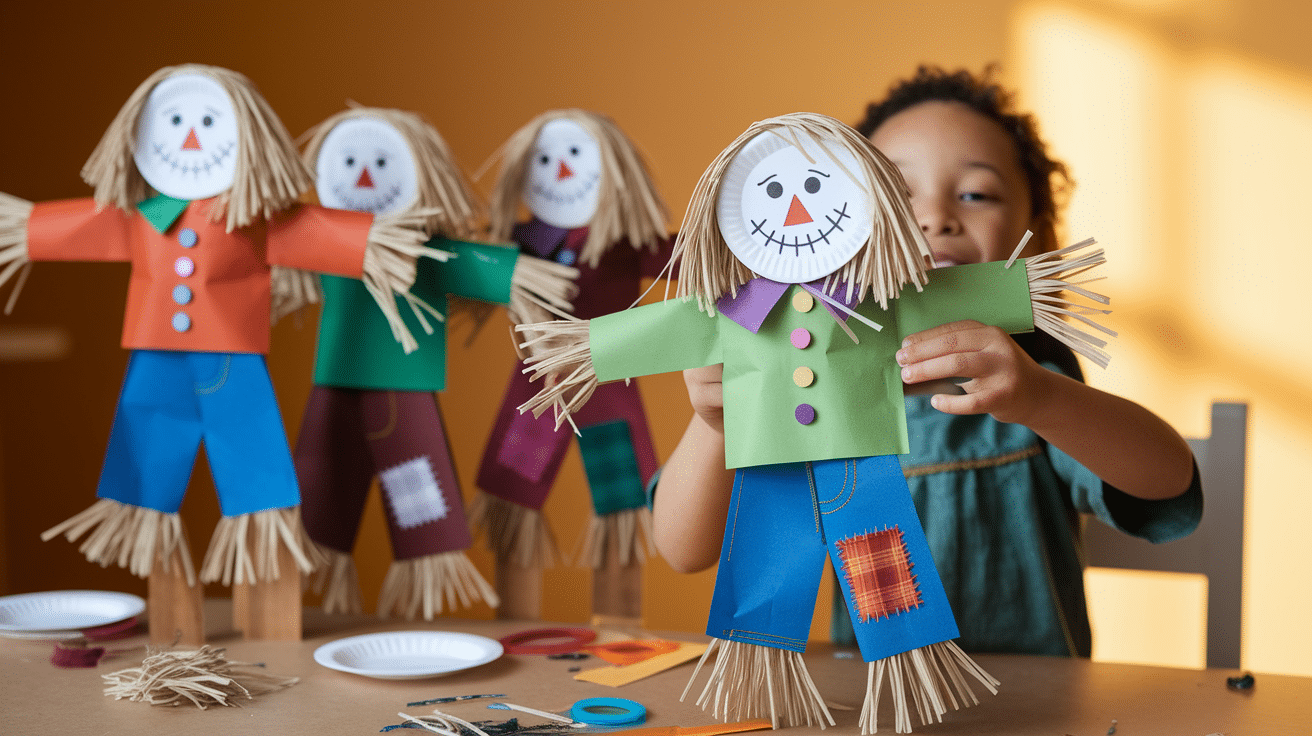
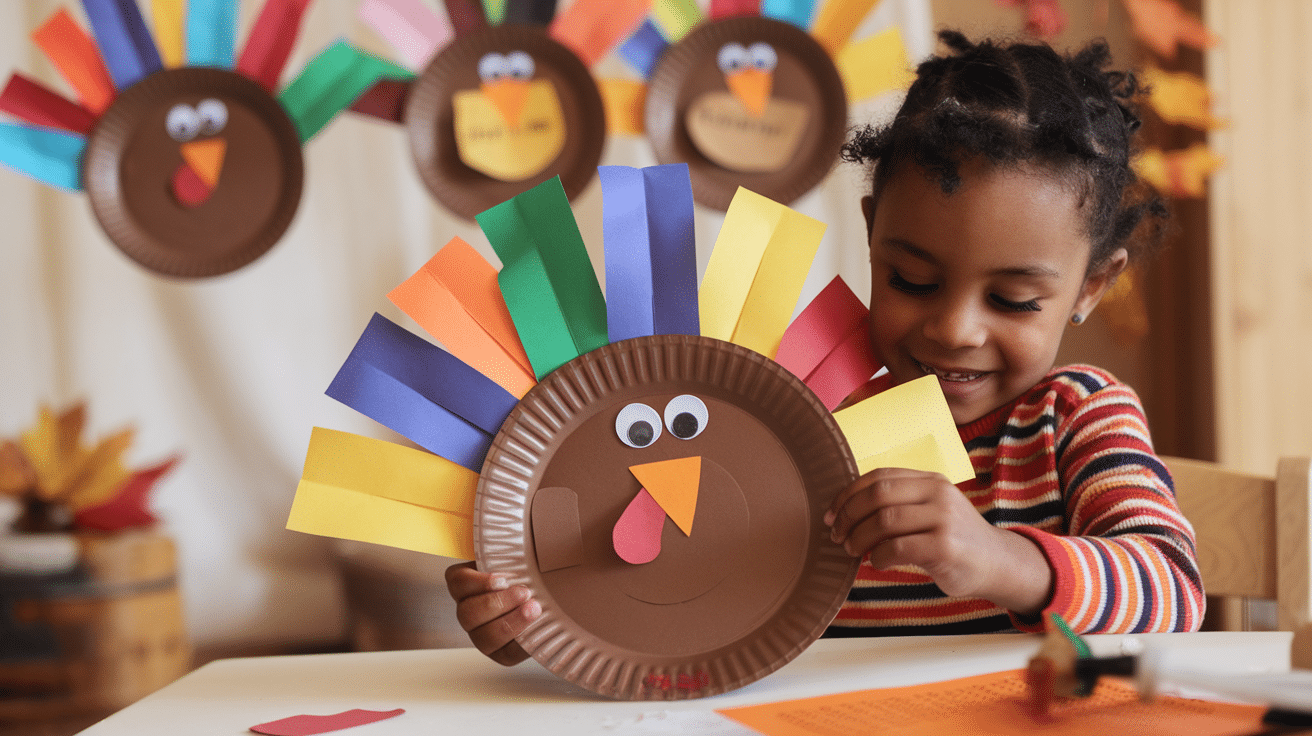
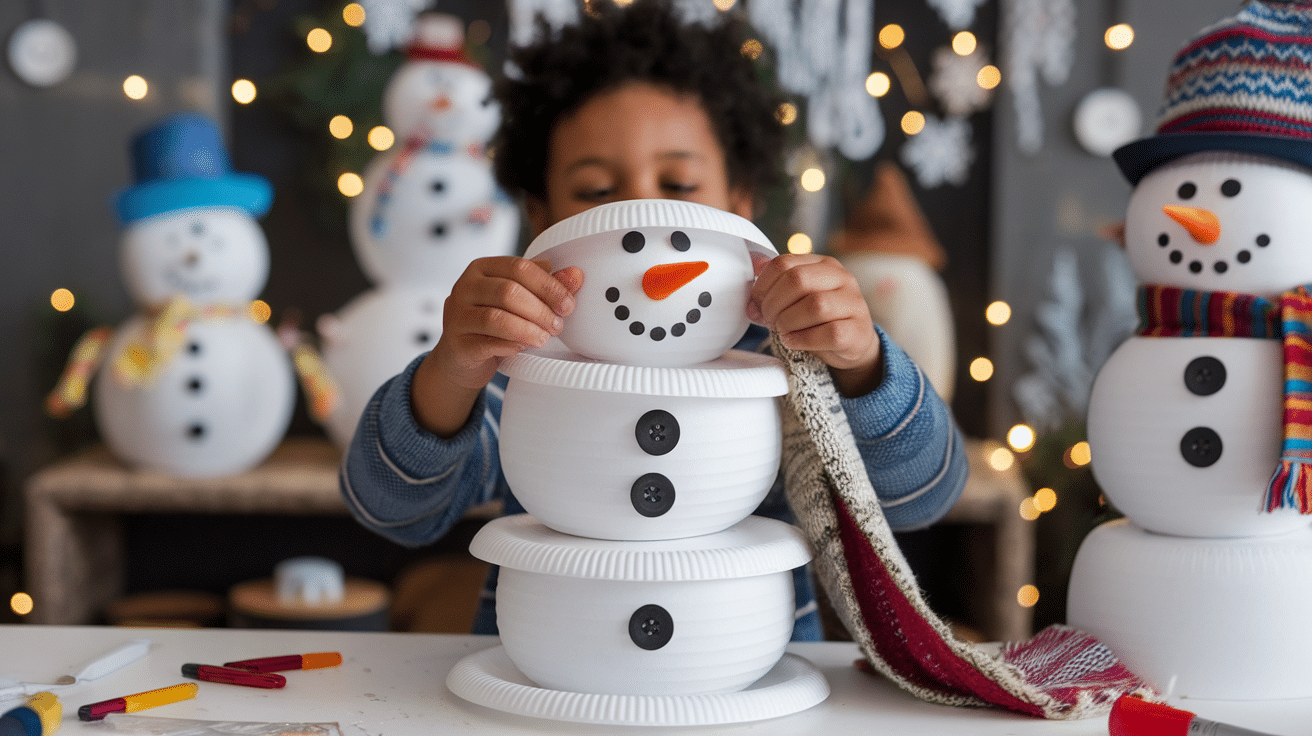
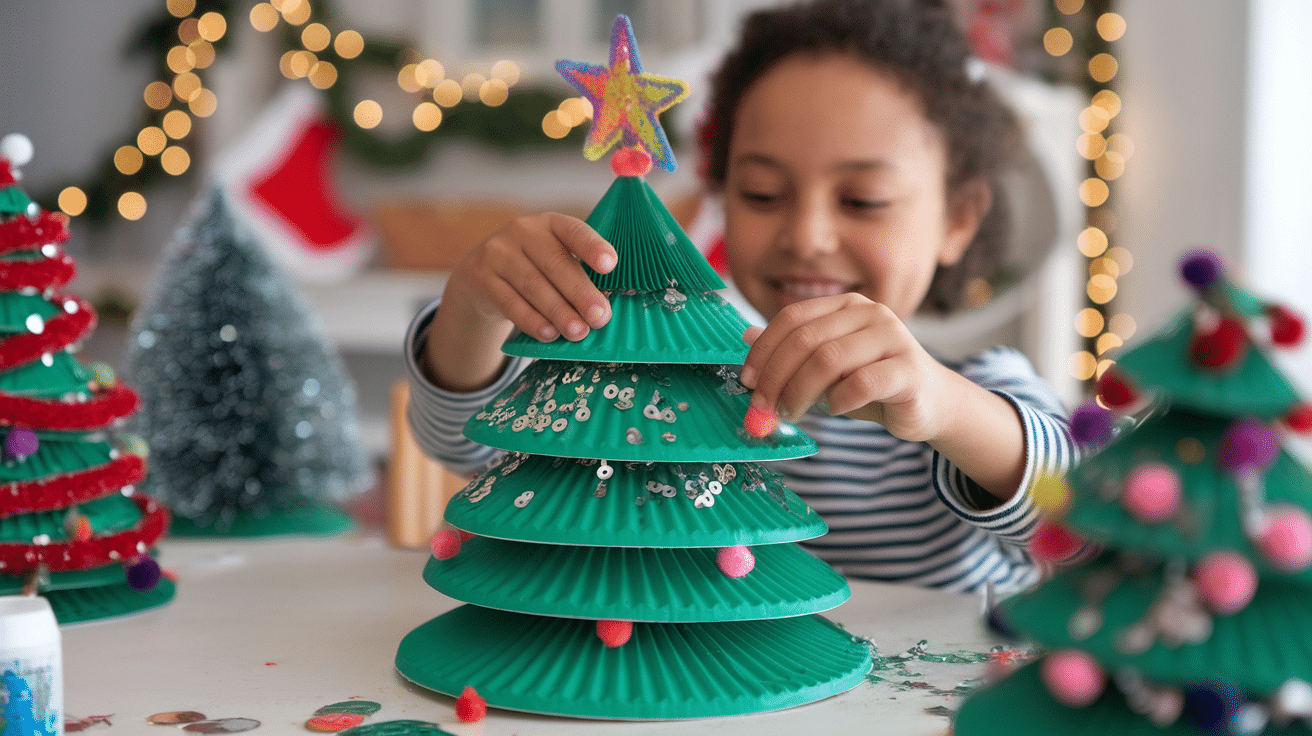
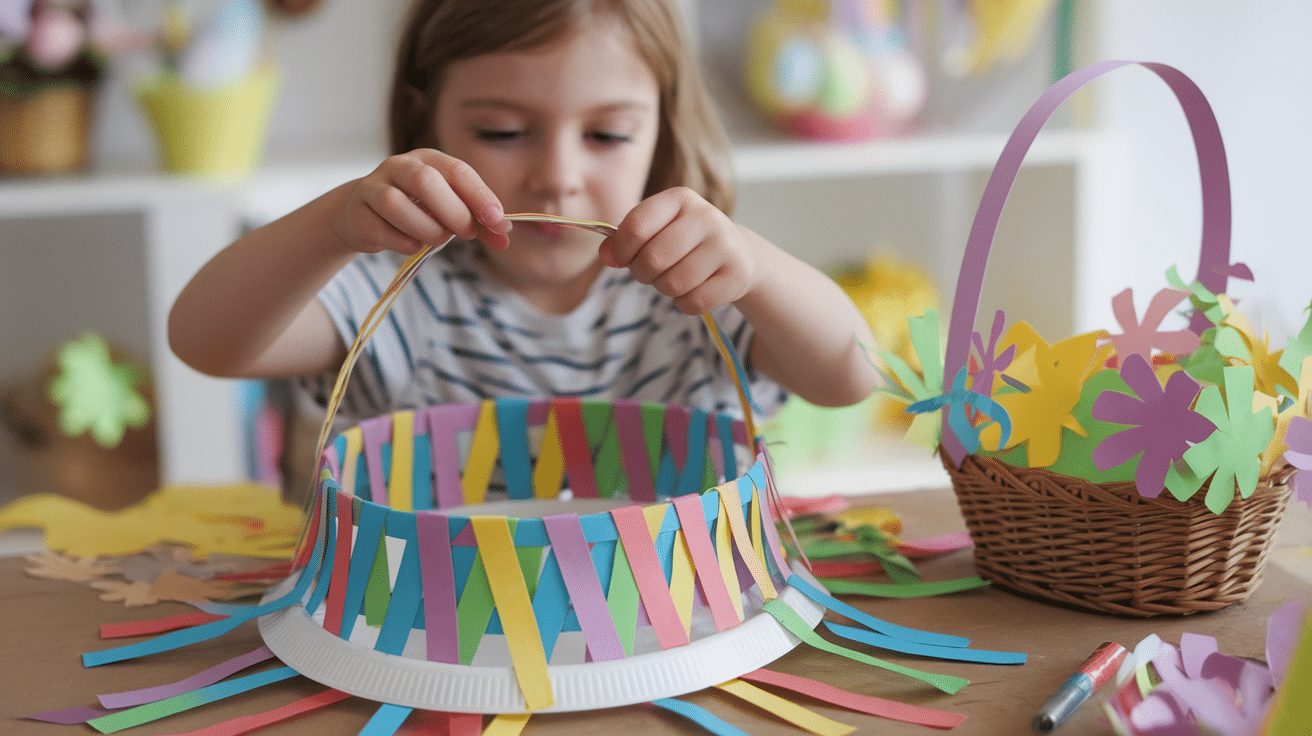
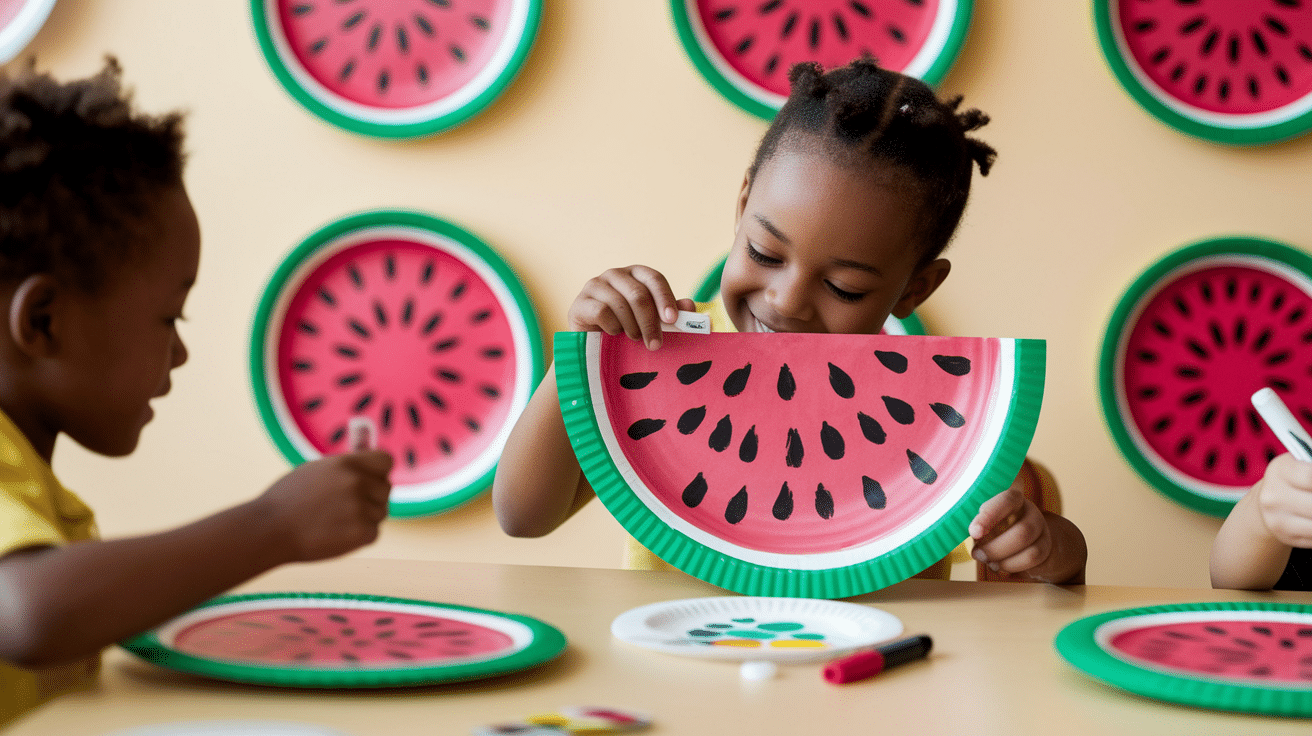
Creative Paper Plate Crafts for Kids
Transform ordinary paper plates into extraordinary creations with these fun and educational craft projects.
Each craft uses simple materials and clear instructions, making them perfect for children of all ages.
1. Paper Plate Lion
Create a majestic lion using yellow paint and fringed paper strips for the mane. Children can practice cutting straight lines while creating the distinctive mane texture.
Add googly eyes and draw on facial features for personality. This craft works wonderfully for jungle or zoo themes, helping children learn about animal habitats.
Let kids experiment with different mane lengths and colors to make each lion unique.
2. Paper Plate Elephant
Transform gray paper plates into gentle elephants by adding cutouts for trunks and ears. This craft teaches children about various animal features while developing symmetry concepts.
Use a second plate cut in half for the large elephant ears, and encourage kids to paint wrinkles on the trunk. This project pairs perfectly with books about African wildlife or circus themes.
3. Paper Plate Pig
Pink paper plates become adorable pigs with simple additions of triangular ears and curly pipe cleaner tails. Children learn about farm animals while practicing basic shapes.
Add a snout made from a small paper cup or rolled construction paper for dimension.
This craft is perfect for farm-themed units, teaching children about domestic animals and their distinctive sounds.
4. Paper Plate Cat Mask
Design wearable cat masks perfect for pretend play. Cut eye holes and add whiskers using construction paper strips.
These masks encourage imaginative play and storytelling. Attach elastic string or craft sticks for easy wearing during dramatic play sessions.
Children can choose different cat colors and patterns to represent their favorite feline friends.
5. Paper Plate Fish
Create colorful underwater scenes using tropical-colored plates and cupcake liner scales. This craft combines fine motor practice with ocean animal education.
Layer multiple cupcake liners in overlapping patterns to create realistic scale textures.
This activity pairs beautifully with ocean-themed books and teaches children about marine ecosystems and different fish species.
6. Paper Plate Jellyfish
Flowing streamers attached to painted plates create mesmerizing jellyfish. Children learn about ocean life while exploring movement and texture through hands-on activities.
Use crepe paper or plastic streamers that move gracefully when the jellyfish is carried or hung.
This craft introduces concepts about marine biology and the unique characteristics of these fascinating sea creatures.
7. Paper Plate Owl
A delightful way to teach kids about nocturnal animals is by making an owl with feathers and googly eyes: use brown plates and add triangular beaks for realistic details.
Layer different colored feathers or use textured paper to create wing patterns that mimic real owl plumage.
This craft connects to lessons about day and night, animals, and their special adaptations.
8. Paper Plate Frog
Transform a paper plate into a hopping frog with green paint and folded paper legs. Add a curled paper tongue for interactive fun that children love pulling.
Create lily pad bases from green construction paper to complete the pond scene. This craft teaches children about amphibians and their life cycles from tadpoles to adult frogs.
9. Paper Plate Turtle
Turn a paper plate into a turtle shell and use a second plate for the body. Paint with green and brown patterns for realistic shell designs.
Add geometric patterns to teach children about shapes while creating authentic-looking turtle shells. This craft introduces concepts about reptiles and their protective adaptations in nature.
10. Paper Plate Butterfly
A beautiful butterfly craft using paper plates and colorful tissue paper wings. Add pipe cleaner antennae for delicate finishing touches.
Encourage children to create symmetrical wing patterns using paint, markers, or tissue paper collage techniques.
This craft connects to lessons about insect life cycles and the metamorphosis process from caterpillar to butterfly.
11. Paper Plate Duck
Make a cute duck by painting the paper plate yellow and adding an orange beak. Perfect for farm animal themes or pond life studies.
Add webbed feet cut from orange construction paper and create texture with cotton balls for fluffy feathers.
This craft teaches children about waterfowl and their special adaptations for swimming and diving.
12. Paper Plate Flowers
Painted paper plates become beautiful blooms that never wilt. Layer different-sized plates for dimensional flowers, perfect for Mother’s Day gifts or spring decorations.
Cut petal shapes around the rim of the plates and curl them for a three-dimensional effect. Children can learn about different flower types and create entire bouquets for special occasions.
13. Paper Plate Sun
Bright yellow plates with paper ray cutouts celebrate sunny weather. Add facial features for cheerful wall decorations that brighten any room.
Use different lengths and shapes of rays to create dynamic sun designs that seem to radiate warmth.
This craft connects to weather studies and teaches children about the sun’s importance in our solar system.
14. Paper Plate Rainbow
Colorful arcs painted on plates with cotton ball clouds create weather-themed decorations. These crafts teach color patterns and weather concepts.
Help children practice color order and blending techniques while creating their rainbow masterpieces.
This activity reinforces learning about weather patterns and the science behind how rainbows form after rainstorms.
15. Paper Plate Pumpkin
Orange plates become festive jack-o’-lanterns with simple face cutouts. Curl paper strips around pencils for decorative stems and leaves.
Let children design their own unique facial expressions, from silly to spooky, to personalize their pumpkins.
This Halloween craft teaches about autumn harvests and seasonal celebrations while developing cutting and design skills.
16. Paper Plate Scarecrow
Create friendly scarecrows using multiple plates for heads and bodies. Add raffia or yarn hair for realistic farm-themed decorations.
Use fabric scraps or construction paper to create colorful clothing and patches for an authentic scarecrow appearance.
This craft teaches children about farming practices and how scarecrows help protect crops from birds.
17. Paper Plate Turkey
Thanksgiving turkeys come alive with colorful feather additions. Children can create gratitude messages on each feather for meaningful holiday crafts.
Use handprint cutouts for tail feathers and encourage children to write what they’re thankful for on each one.
This craft combines holiday traditions with lessons about gratitude and Native American history.
18. Paper Plate Snowman
White plates stack together for classic winter characters. Add fabric scraps for scarves and tiny buttons for realistic details.
Create snowmen of different sizes using various plate sizes and add personality with unique hat and accessory choices.
This winter craft teaches about seasonal changes and encourages creativity in character development.
19. Paper Plate Christmas Tree
Green triangular cuts from plates create festive trees. Decorate with pom-poms, sequins, or small ornament cutouts for holiday sparkle.
Layer multiple tree shapes for dimensional effects and add a star or angel topper for finishing touches.
This holiday craft allows children to practice fine motor skills while creating personalized Christmas decorations.
20. Paper Plate Santa
Red and white plates combine for jolly Santa faces. Cotton balls create fluffy beards while red paper forms distinctive hats.
Encourage children to make Santa faces with different expressions and beard styles for variety.
This Christmas craft connects to holiday traditions and storytelling while developing artistic skills and creativity.
21. Paper Plate Easter Basket
Use a paper plate to craft a basket and fill it with paper flowers for Easter. Cut handles from construction paper for carrying convenience.
Weave colorful paper strips through slits in the plate to create a basket-like texture and appearance.
This spring craft teaches about Easter traditions while practicing weaving and fine motor skills.
22. Paper Plate Valentine’s Day Heart
Craft a lovable heart with a paper plate and tissue paper for a Valentine’s gift. Decorate with lace, ribbons, and heartfelt messages.
Cut heart shapes from plates and layer them with different textures and materials for dimensional effects.
This Valentine’s craft encourages children to express feelings and create meaningful gifts for loved ones.
23. Paper Plate Captain America Shield
Layer different-sized plates in patriotic colors for superhero role-play. These sturdy shields encourage active, imaginative play.
Add metallic paint or foil accents to create authentic-looking shield surfaces that catch the light.
This superhero craft promotes active play while teaching about American symbols and patriotic themes.
24. Paper Plate Masks
Create various character masks using paint, markers, and decorative elements. Oil pastels, when combined with watercolors, produce vibrant, artistic results.
Add feathers, sequins, or fabric scraps for texture and visual interest in mask designs.
These versatile masks work for costume parties, dramatic play, or cultural celebrations and festivals.
25. Paper Plate Minions
Yellow plates transform into beloved animated characters with simple paint additions and creative accessories.
Mason jar lids make perfect goggle elements. Add blue overalls made from construction paper and create different expressions for various Minion personalities.
This popular character craft appeals to children’s love of animated movies while practicing artistic skills.
26. Paper Plate Emojis
Teach emotional recognition through expressive emoji plates. These versatile crafts work as puppets or photo props for parties.
Create a whole collection of different emoji expressions to help children identify and discuss various emotions.
This modern craft connects to social-emotional learning while providing fun party entertainment and photo opportunities.
27. Paper Plate Dream Catchers
Older children can create beautiful dream catchers by cutting plate centers and weaving colorful yarn patterns.
These projects develop patience and following complex instructions. Add beads, feathers, and personal touches to make each dream catcher unique and meaningful.
This craft introduces Native American traditions while teaching about different cultures and their beliefs.
28. Paper Plate Crowns
Royal headwear emerges from decorated plates cut into crown shapes. Embellish with gems, buttons, or pom-poms for regal finishing touches.
Adjust crown sizes to fit different head sizes and encourage children to design crowns for different royal characters.
This dress-up craft encourages imaginative play and storytelling while developing fine motor skills through the process of decorating.
29. Paper Plate Clocks
Educational time-telling crafts combine learning with creativity. Add movable hands to help children practice telling time.
Use Brad fasteners to attach movable clock hands and decorate the face with numbers and designs.
This functional craft reinforces math concepts while creating a useful learning tool for ongoing time-telling practice.
30. Paper Plate Fans
Functional cooling devices for warm weather, decorated with personal artistic touches. These practical crafts serve dual purposes.
Fold plates accordion-style and attach wooden craft sticks for handles that children can use.
This summer craft teaches about different cultures that use fans while providing relief from hot weather.
31. Paper Plate Umbrella
A great rainy-day craft to create a fun umbrella with colorful designs. Add paper handles and waterproof decorations for pretend play.
Use contact paper or laminate finished umbrellas to make them more durable for outdoor pretend play.
This weather-themed craft teaches about protection from rain while encouraging imaginative play scenarios.
32. Paper Plate Watermelon
A fun craft for summer, using a paper plate to create a juicy watermelon slice. Paint pink centers with black seeds for a realistic appearance.
Add green rinds and create different watermelon varieties by varying the shades of pink and red.
This summer, Fruit Craft teaches about healthy eating while creating appetizing-looking food art for play kitchens.
33. Paper Plate Spider
Perfect for Halloween, create a creepy paper plate spider with legs made of pipe cleaners. Add googly eyes for a spooky but friendly appeal.
Bend pipe cleaner legs into realistic spider positions and create egg sacs or webs for complete spider scenes.
This Halloween craft teaches children about arachnids while helping them overcome fears through creative, non-threatening representations of spiders.
Age-Appropriate Adaptations
Younger children benefit from simpler techniques and more hands-on guidance, while older kids can tackle complex designs independently.
Age Group
Skills Focus
Project Complexity
Key Activities
Preschool (Ages 3-5)
Simple painting, basic cutting with supervision, and large motor movements
Basic single-step projects
Sensory experiences, color exploration, finger painting, tearing paper
Elementary (Ages 6-10)
Complex cutting techniques, detailed decorating, and multi-step projects
Intermediate layered crafts
Independent problem-solving, creative decision-making, and following instructions
Advanced (Ages 11+)
Intricate designs, layered constructions, and combination techniques
Complex multi-material projects
Advanced planning, detailed execution, innovative material combinations
Understanding these adaptations ensures every child experiences success and enjoys the creative process at their own pace.
Building Memories Through Creative Expression
Paper plate crafts offer countless possibilities for creative expression while supporting child development across multiple skill areas.
These engaging yet straightforward projects create lasting memories and foster lifelong appreciation for artistic activities that children carry into adulthood.
Each project becomes a stepping stone in their creative growth, teaching valuable lessons about patience, planning, and perseverance.
The skills developed through these hands-on activities extend far beyond art, supporting academic learning and social-emotional development. We’d love to see how your paper plate crafts turn out!
These projects are designed to be adapted, personalized, and made uniquely your own.
Have you tried any of these paper plate crafts with your children or students? We encourage you to share your experiences and creative modifications in the comments below.
When it comes to ensuring the longevity and efficiency of your vehicle, choosing the right engine oil is akin to selecting the best quality fuel for your body. Imagine, if you will, a world where every move you make is smooth, every jog feels like gliding, and energy flows through you with no hiccups. This is what 5W30 engine oil can do for your car.
Understanding the Vital Role of 5W30 Engine Oil
Engine oil serves as the lifeblood of your car’s engine, providing necessary lubrication to all the moving parts. Among the various types available, 5W30 engine oil stands out for its versatility and ability to enhance engine performance. This type of oil is designed to function exceptionally well within a wide range of temperatures, making it a suitable choice for many vehicle owners across different climates.
The ‘5W’ indicates how easily the oil flows at low temperatures, while ’30’ describes the oil’s viscosity at higher temperatures. This balance ensures that whether you’re starting your car on a cold winter morning or cruising on a hot summer day, the engine’s internal components are protected against wear and tear.
The Emotional Balance of Choosing the Right Oil
Think back to a time when you stood teetering on the edge of an important decision. The moment might have felt precarious, like balancing on a seesaw, unsure which way to lean. This is often how car owners feel when selecting an engine oil. However, choosing 5W30 can bring peace of mind, knowing that it’s a widely recommended and reliable option for many types of vehicles. It’s like finally finding your balance on that teeter, stable and secure.
5W30 Engine Oil and Your Car’s Lifespan
The continuous use of 5W30 can significantly impact your vehicle’s lifespan. By safeguarding your engine against extreme temperatures and reducing friction, this oil minimizes the risk of premature engine wear. It’s akin to hydrating your body; just as water helps you operate at peak efficiency, the right engine oil ensures that your car’s engine is always performing optimally.
A Personal Anecdote on Persistence
Let’s consider the story of someone who, after years of neglecting the importance of using quality engine oil, eventually faced persistent engine issues. Each trip to the mechanic brought more frustration and expense, a cycle as irksome as an itch that couldn’t be scratched. After finally switching to a high-quality 5W30 oil, they noticed an immediate improvement in engine performance and efficiency. This change didn’t just solve the immediate issues but also restored their peace of mind.
The Unseen Benefits of 5W30 Engine Oil
Beyond the obvious advantages of engine protection and performance enhancement, using 5W30 engine oil also contributes to better fuel economy. With less friction to overcome, your engine doesn’t have to work as hard, which means it uses fuel more efficiently. This subtle benefit often goes unnoticed until you start to realize how infrequently you need to stop for gas compared to before.
A Note on Seasonal Changes and Engine Oil
As seasons change, the demands on your vehicle’s engine fluctuate. Winter’s chill and summer’s blaze can make most engines irritable, behaving like a tired child who fluctuates between extremes. 5W30 engine oil steps in as a comforting force, versatile enough to handle temperature swings while maintaining its protective qualities. This adaptability helps avoid the stress of seasonal oil changes, offering year-round peace of mind.
Choosing the Right 5W30 Engine Oil
When you stand in the aisle of engine oils, faced with choices, remember that not all oils are created equal. Look for reputable brands that offer performance-tested 5W30 oils. These products often come with additives that enhance oil stability and engine cleanliness, factors crucial for maintaining your engine in top condition.
Your Role in Maintaining Engine Health
While choosing the right engine oil is crucial, so is regular maintenance. Regular oil changes, as specified by your car’s manufacturer, are vital. Think of it as regular check-ups for your health. Just as you wouldn’t skip a doctor’s appointment, don’t overlook an oil change. This simple step can be the difference between a car that lasts a decade and one that disappoints.
Wrap-up: The Heartbeat of Your Vehicle
In essence, 5W30 engine oil is more than just a lubricant; it’s a key contributor to your vehicle’s health and performance. By choosing it wisely and adhering to maintenance schedules, you ensure that your car remains a reliable companion on your life’s journeys. Just as every heart needs a steady beat, every engine needs the right oil to thrive. Make your choice count, and watch your car thank you mile after mile.
Tie-dye continues to be a favorite craft activity and fashion statement for people of all ages. The bright, multi-colored patterns bring joy and individuality to everyday clothing.
However, preserving these vibrant colors requires proper care, especially during the initial wash. Many crafters and tie-dye enthusiasts wonder: Should you use detergent when washing a tie-dye shirt for the first time?
This guide will walk you through everything you need to know about maintaining your tie-dye creations so the colors stay bright and beautiful for years to come.
Understanding Tie-Dye: Why First Wash Matters?
When you create tie-dye, the dyes bond with fabric fibers through a chemical reaction. During this process, excess dye remains on the surface of the material.
This loose dye needs to be removed properly to prevent it from transferring to other items or causing the colors to look muddy.
The initial wash serves three important purposes:
Removes unattached dye particles
Helps set the colors properly
Prepares the garment for regular wear
What happens during this first cleaning cycle significantly impacts how well your tie-dye maintains its vibrancy over time. One wrong move could lead to premature fading or colors running together.
Should You Use Detergent the First Time?
Yes, you should use a mild detergent when washing tie-dye for the first time.
Using a small amount of mild detergent helps remove excess dye while maintaining the colors that have properly bonded to the fabric.
The detergent breaks down and carries away loose dye particles without affecting the dye that has chemically bonded to the fibers.
A common mistake is skipping detergent altogether, thinking this will protect the colors. However, water alone won’t effectively remove all the excess dye, potentially leading to color transfer later.
The right detergent for tie-dye shirts will help maintain those bright, clear color separations that make tie-dye so appealing.
How to Wash a Tie-Dye Shirt for the First Time: A Step-by-Step Guide
Follow these steps for the best results when washing your tie-dye creation for the first time:
Step 1: Initial Rinse
Remove all rubber bands or ties from your shirt and hold it under cold running water. Focus on one section at a time, rinsing until the water runs mostly clear.
This process might take 5-10 minutes of continuous rinsing. The cold water helps maintain color intensity while removing loose dye particles that haven’t bonded with the fabric.
Step 2: Prepare Washing Machine
Set your washing machine to the coldest water setting and select a gentle cycle with low spin. Adding an extra rinse cycle is helpful if your machine offers this option.
Cold water maintains the chemical bonds between dye and fabric, while warm or hot water can break these bonds, causing premature fading and color blending. The gentle cycle minimizes friction that can wear down fabric and dye.
Step 3: Wash Alone
Place your tie-dye item in the washing machine by itself—no other clothes, not even other tie-dye items. This isolated washing prevents any remaining loose dye from transferring to other items.
Even after thorough rinsing, the agitation of the washing machine may release additional dye. After 3-4 solo washes, your item will likely be safe to wash with similar colors.
Step 4: Add Detergent
Measure approximately half the normal amount of mild detergent recommended for a load. Too much detergent can strip away color, while too little won’t effectively remove excess dye.
Liquid detergents generally work better than powders for tie-dye as they dissolve completely in cold water. Avoid detergents with optical brighteners or bleach alternatives, as these chemicals can react with dyes.
Step 5: Run Cycle
Start the washing machine and allow it to complete the full cycle without interruption. The combination of gentle agitation and detergent will remove any remaining loose dye particles while setting the permanent ones.
This mechanical action helps the colors appear more crisp and defined. If possible, watch the water during the rinse cycle—it should be mostly clear by the end.
Step 6: Drying
Remove the tie-dye item promptly when the wash cycle completes. Hang it to air dry in a shaded location away from direct sunlight. If you must use a dryer, use the lowest heat setting or air-only mode.
Heat can set wrinkles and cause fading. The cooler drying process helps maintain color intensity and fabric integrity, extending the lifespan of your colorful creation.
Best Detergents for Tie-Dye Shirts
Not all detergents are created equal when it comes to preserving tie-dye colors. Here are the best options:
Seventh Generation Free & Clear – An excellent plant-based option without dyes, fragrances, or brighteners that might affect your tie-dye colors.
Mrs. Meyer’s Clean Day – While it contains fragrance, its gentle plant-derived formula works well for most tie-dye fabrics.
Woolite Gentle Cycle – Specifically formulated for color care and preservation with minimal harsh cleaning agents.
Ecos Free & Clear – This plant-based, hypoallergenic formula contains no optical brighteners or harsh chemicals that could damage dye bonds.
Dr. Bronner’s Pure-Castile Liquid Soap – Though not a traditional laundry detergent, many tie-dye enthusiasts find the mild castile soap excellent for preserving vibrant colors when used in small amounts.
Molly’s Suds Original Laundry Powder – A minimalist formula with just five ingredients, free of harsh chemicals that could break down dye bonds.
Method Free & Clear – The fragrance-free, plant-based formula avoids many of the color-stripping ingredients found in conventional detergents.
For optimal results, use approximately half the recommended amount of detergent for a regular load. This provides sufficient cleaning power while minimizing exposure to ingredients that might affect the colors.
Tips to Prevent Fading Over Time
Your tie-dye’s first wash sets the foundation, but long-term care determines how well those vibrant colors will last through months and years of wear.
Follow these proven maintenance strategies to keep your tie-dye looking as bright as the day you created it:
Always turn inside out: This reduces friction on the dyed surface during washing
Cold water only: Hot water breaks down dye bonds faster
Wash with similar colors: After the first few washes, you can include other darkly colored items
Minimize washing frequency: Only wash when truly needed to extend color life
Use vinegar occasionally: A half cup of white vinegar in the rinse cycle once a month helps set colors
Choose shade for drying: Direct sunlight can fade colors quickly
Remember that each wash gradually removes tiny amounts of dye, so treating your tie-dye with care during cleaning is the single most important factor in preserving its eye-catching appearance for years to come.
Final Thoughts
Proper care of your tie-dye starts with that crucial first wash. Using a mild detergent helps remove excess dye while preserving the colors that have bonded to the fabric.
Remember that each tie-dye creation is unique; part of the charm is the individual nature of each piece. With proper washing and care techniques, your tie-dye will remain a colorful expression of creativity for years.
We’d love to hear about your tie-dye washing experiences in the comments below. What techniques have worked best for you? Do you have any questions about caring for your colorful creations?
Frequently Asked Questions (FAQs)
Can You Wash Newly Tie-Dye Shirts Together?
Not for first washes. Each new tie-dye item needs 2-3 solo washes to remove excess dye. Afterward, wash with similar dark colors to prevent color transfer.
What if My Shirt Keeps Bleeding Color?
Soak the shirt in cold water with 1/2 cup salt per gallon for 30 minutes. This helps set loose dye molecules before washing again with mild detergent.
How to Make Tie-Dye More Vibrant?
Pre-treat fabric with soda ash solution before dyeing. Use professional-grade fiber-reactive dyes rather than craft store kits for truly long-lasting, vibrant results.